You hear scratching in the wall after midnight. In the morning, you pull out a box in the pantry, look behind a basement shelf, or move a stove and find shredded material packed into a tight mass. There are droppings nearby, a stale odor in the air, and a sinking feeling that your house has been hosting something you didn't invite.
That reaction is normal. Most homeowners first think about pest removal. The harder truth is that rat nests in houses are both a pest problem and a contamination problem. If you only solve the first half, you can leave disease risk, odor, damaged materials, and recurrence behind.
A calm response matters. So does a complete one.
The Discovery and What It Really Means
A typical discovery starts small. Someone hears movement in the ceiling, notices a torn bag of pet food, or sees insulation pulled into a corner of the attic. Then the signs begin to connect. The noise at night. The dark droppings near a utility room wall. The greasy streak near a baseboard.
At that point, many people still hope it's isolated. Sometimes it is. But the presence of a nest usually means the structure offered three things rats wanted: shelter, warmth, and enough access to food or water to stay.
This is happening against a broader urban trend. In major urban centers, 69% of studied cities, 11 out of 16, showed significant increasing trends in rat populations, with the rise linked to climate warming, urbanization, and reduced vegetated land cover, according to this urban rat population analysis. In practical terms, that means indoor nesting isn't a rare fluke. It's becoming a more common property hazard in dense, built environments.
What matters first: finding a nest isn't just evidence of an animal problem. It's evidence that a part of the home may now contain contaminated materials.
The next few hours are more critical than generally understood. Disturbing droppings, sweeping dry waste, or pulling apart nesting material can make the situation riskier. If you've just made a discovery, follow a biohazard discovery safety checklist before you start moving things around.
The good news is that there is a disciplined way to handle this. It starts with identifying what you're looking at, then separating pest control from the deeper work of decontamination and structural correction.
Identifying Rat Nests and Their Common Hiding Spots
A rat nest inside a home usually doesn't look dramatic. It often looks like trash at first glance. That's why people miss active nesting until the contamination spreads or the sounds become impossible to ignore.
What a nest usually looks like
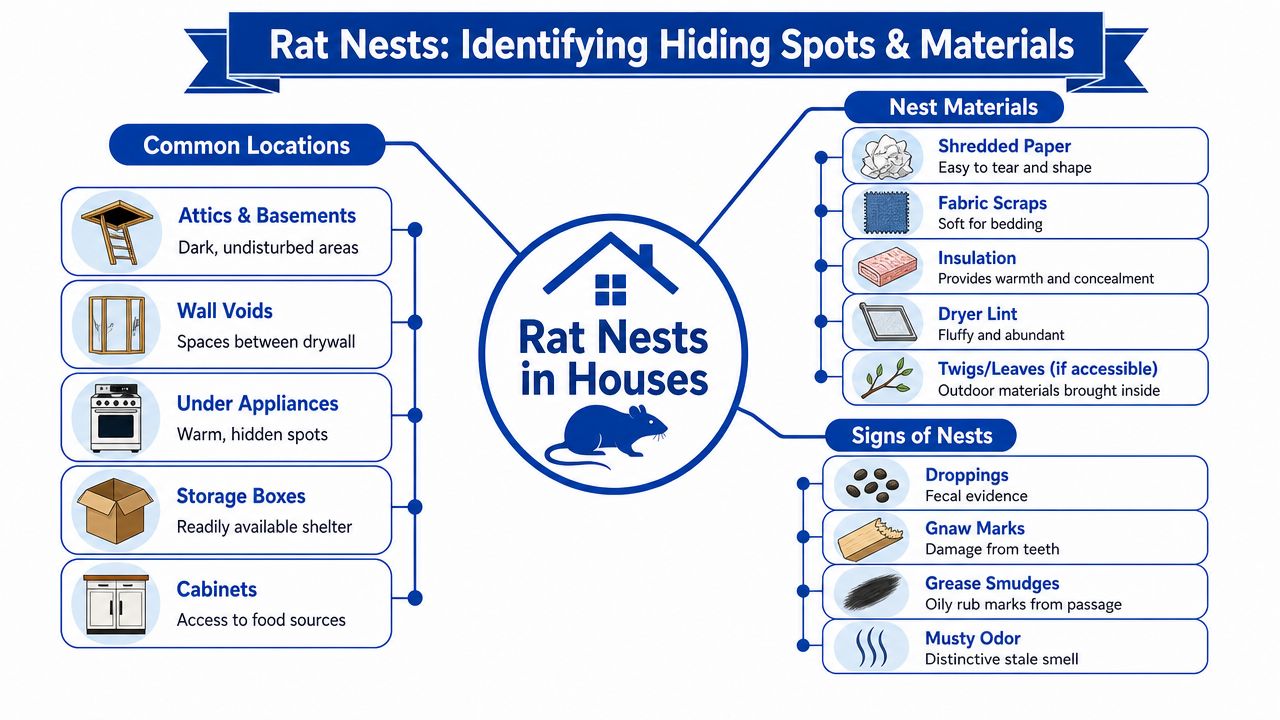
Indoor rat nests typically contain 5 to 10 rats and often resemble a solid, football-sized mass made from shredded insulation, cardboard, and fabric, as described in this nest identification reference. In some houses, the structure is tighter and smaller. In others, it spreads out into wall voids or storage cavities.
You'll often find the nest built from whatever is easiest to tear and carry:
- Insulation fibers pulled from attics, crawl spaces, or wall cavities
- Paper and cardboard from boxes, pantry stock, or stored records
- Fabric scraps from laundry areas, furniture backing, or stored clothing
- Soft debris such as dryer lint or plant matter if the house gives them access
Where rats hide inside houses
Different rats prefer different zones. A separate trade reference notes that roof rats tend to use high warm spaces such as attics and crawl spaces, while Norway rats favor lower areas such as basements and wall cavities near food sources in this rodent nest identification guide.
Look carefully in places that stay dark, warm, and undisturbed:
- Behind kitchen appliances where heat and crumbs are available
- Attics where insulation gives them both material and concealment
- Crawl spaces with clutter, duct penetrations, or moisture issues
- Wall voids near plumbing and utility runs
- Basement storage areas with boxes, textiles, and infrequent foot traffic
The signs around the nest matter as much as the nest
The surrounding evidence often confirms activity before the nest itself does. Common indicators include:
- Droppings that are dark, spindle-shaped, and about 1/2 to 3/4 inch
- Gnaw marks on wood, wiring, cardboard, and plastic
- Greasy rub marks along baseboards or travel paths
- Night sounds such as scratching, gnawing, or quick foot movement inside walls or ceilings
If you're trying to distinguish rodent evidence correctly, this guide on mouse or rat droppings can help you avoid misidentifying the problem.
A single hidden nest can create signs in multiple rooms. Rats travel. Homeowners often find the evidence far from the main nesting site.
One more clue matters. When you see repeated pathways, especially along edges, pipes, baseboards, and behind stored items, you're not just looking for where they sleep. You're mapping how they move through the structure.
The Unseen Health and Structural Risks Left Behind
Once the rats are gone, many homeowners assume the danger is gone too. That's the mistake that creates lingering illness, persistent odor, and repeat contamination events.
Pest removal is not the same as remediation
Rat nests can harbor pathogens such as Hantavirus and Leptospirosis, and those hazards can remain in urine, feces, and nest materials after the rodents are removed, as noted in this post-infestation contamination overview. That same source also notes that basic household disinfection often falls short, and that rodent waste requires EPA-rated biohazard disinfectants and professional decontamination.
That distinction matters because contamination isn't limited to what you can see. A nest behind a wall can leave residue in adjacent cavities. Urine can wick into porous materials. Droppings can break down and spread particulates when disturbed.
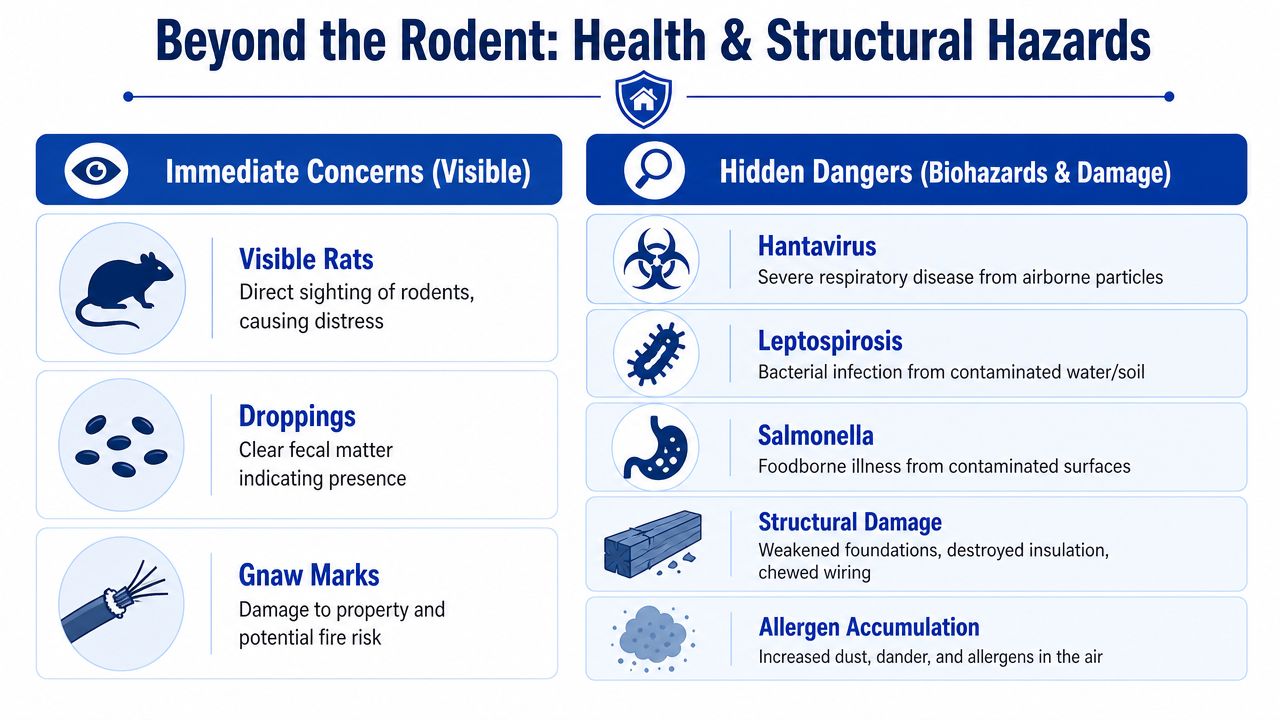
There's also the structural side. Rats don't just occupy a home. They alter it. They chew insulation, tear vapor barriers, contaminate stored materials, and gnaw wiring. If there's visible damage to framing areas, subfloors, access panels, or utility penetrations, it's wise to pair remediation with a professional structural integrity assessment so hidden building damage isn't missed.
How contamination spreads after discovery
A homeowner often creates the highest-risk moment by trying to clean too quickly. Dry sweeping, vacuuming, and tearing out nest material can push contaminated dust into the breathing zone and onto nearby surfaces.
This is why contaminated rodent areas should be treated more like an environmental cleanup than a housekeeping chore. In houses with broad contamination, people often need a dedicated contaminated property cleanup approach rather than a simple wipe-down.
A short explainer on the hazard can help frame that difference:
What people usually underestimate
The visible nest is only part of the hazard footprint. The larger concerns usually include:
| Concern | Why it matters |
|---|---|
| Urine and feces residue | These can contaminate porous and non-porous surfaces beyond the nest itself |
| Compromised insulation | Contaminated insulation can hold odor and particulates |
| Chewed wiring | Electrical damage creates a serious safety issue |
| Parasites and secondary contamination | Fleas and other pests can remain after the rats are gone |
If the area still smells after pest removal, the house is telling you contamination remains.
Your Safe Response Plan What to Do and What to Avoid
A homeowner doesn't need to be helpless here. But there's a line between safe first actions and unsafe cleanup. Crossing that line usually happens with good intentions.
What you can do safely
Take non-contact steps that reduce risk and preserve the scene for proper assessment.
- Isolate the area: Close the room, attic hatch, crawl space access, or cabinet if you can do so without disturbing material.
- Keep people and pets out: Children, pets, and anyone with respiratory vulnerability should stay clear.
- Document what you see: Photos of droppings, gnawing, nest material, and access points help guide next steps.
- Limit air disturbance: Don't run fans into the area and don't start moving stored items around.
What you should avoid
Some of the most common DIY actions are also the most hazardous.
- Don't vacuum droppings or nest debris: That can aerosolize contaminated particles.
- Don't sweep dry waste: The same problem applies. Agitation spreads residue.
- Don't handle material with bare hands: Gloves alone don't solve inhalation or cross-contamination risk.
- Don't rely on ordinary household cleaners: The issue isn't surface freshness. It's pathogen control with the right chemistry and contact time.
- Don't tear open walls or insulation casually: You can spread contamination into clean parts of the house.
Safety boundary: If you have active nest material, broad droppings, contamination in HVAC-adjacent spaces, or evidence inside walls, attics, or crawl spaces, stop at documentation and containment.
Homeowners often search for advice on how to clean mouse droppings, and some of the basic caution principles overlap. But a rat nesting event often involves larger waste volume, heavier contamination, and more structural involvement. That changes the response.
There's also an emotional trade-off here. Doing it yourself can feel faster and cheaper in the moment. If you spread contaminated material, damage hidden finishes, or miss the actual nesting footprint, it often becomes slower, more invasive, and more expensive to correct later. The safer choice is usually the one that interrupts the problem before you disturb it.
The Professional Biohazard Remediation Process
When rat contamination is handled properly, the work follows a scientific sequence. That sequence exists for one reason. A room can look clean while still being unsafe.
The five required phases
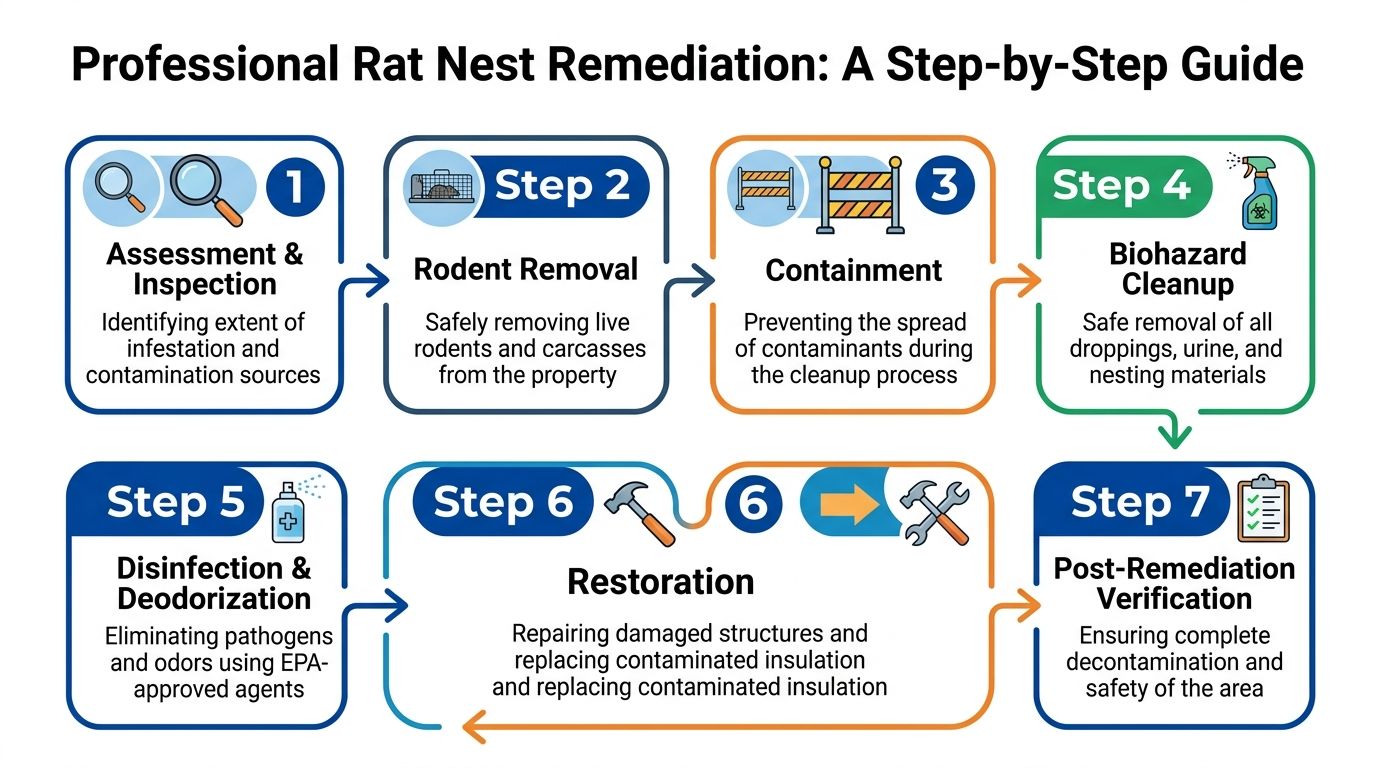
Professional biohazard remediation is defined as a multi-phase process consisting of assessment and hazard identification, containment, removal of contaminated materials, decontamination with EPA-registered disinfectants, and verification via written clearance reports, according to these biohazard remediation industry standards.
That framework keeps cleanup from becoming guesswork.
What that looks like on site
The workflow in a real house usually unfolds like this:
Assessment first
Technicians identify where contamination started, where it traveled, and which materials can be cleaned versus removed. Nesting in insulation, porous cabinetry backing, or wall void debris often requires more than surface treatment.Containment before disruption
The work area is isolated so debris and aerosols don't spread into unaffected rooms. This matters most in attics, basements, utility chases, and shared air spaces.Controlled removal of waste and damaged materials
Nest material, droppings, contaminated insulation, and compromised porous contents are removed under handling protocols designed to limit spread.Decontamination with the correct chemistry
EPA-registered disinfectants are used according to label directions, including required contact times. Contact time is not optional. It's part of effective pathogen kill.Verification and documentation
A professional job ends with records, not assumptions. Written clearance reporting creates a defensible record of what was found, what was removed, and how the area was treated.
Training and compliance matter
Cleanup quality depends on worker training, not just equipment. OSHA states that workers performing offensive or aggressive roles in hazardous substance release control must have hazardous materials technician-level training equivalent to 24 hours, while defensive role workers need at least 8 hours covering decontamination and personal protective equipment under this OSHA interpretation on training requirements.
In practical terms, trained crews understand contamination boundaries, PPE selection, waste handling, and why a nest site can't be treated like a janitorial task. If you want a general outside perspective on specialist biohazard cleaning solutions, it's useful to compare how serious providers describe containment, disinfection, and regulated handling. The language should sound methodical, not casual.
Clean-looking isn't the standard. Safely decontaminated and documented is the standard.
Preventing Future Infestations with Structural Exclusion
After cleanup, the next job is making sure the house stops inviting rats back in. However, many efforts fail here. People sanitize the space, set traps, remove the nest, and leave the entry route untouched.
The openings that matter most
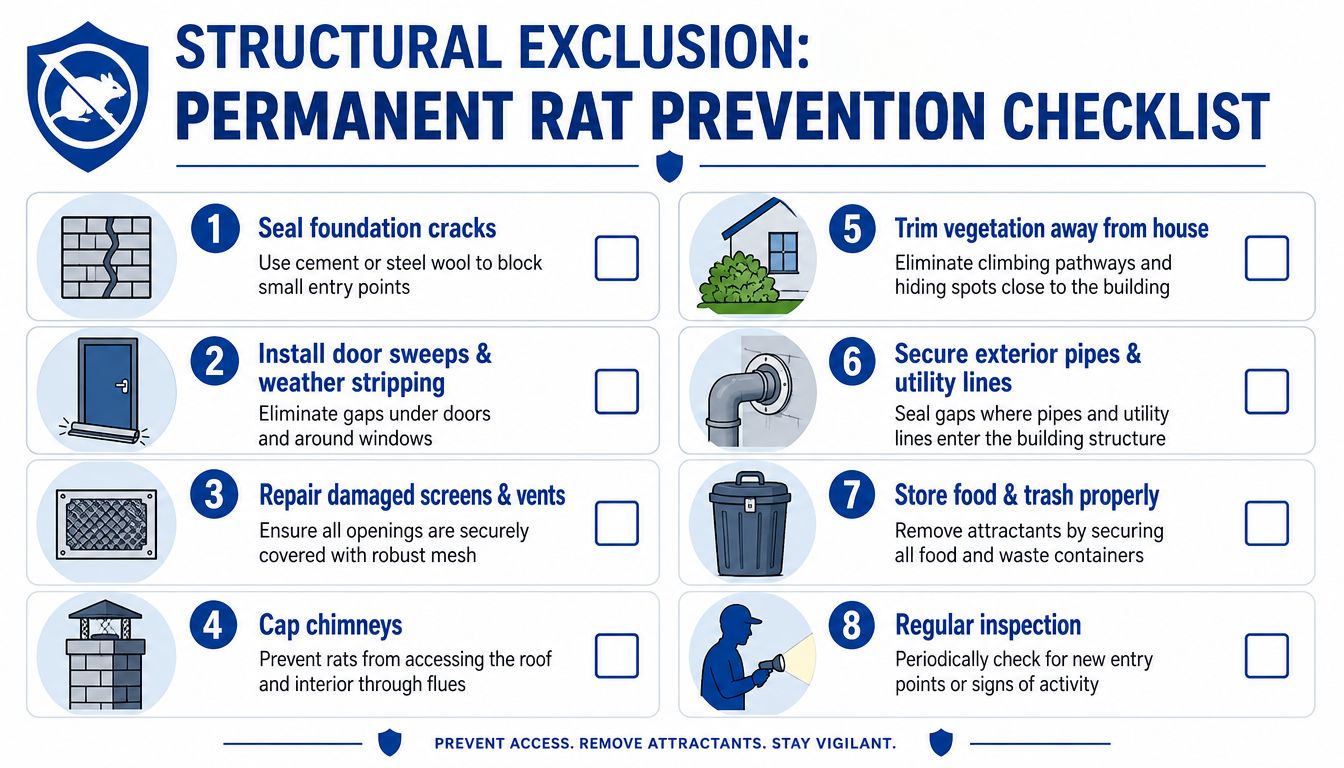
Structural exclusion is the primary intervention for rat control, and gaps of 1/4 inch or larger can allow juvenile rat entry, according to this rat exclusion guidance from NC State. That same guidance states that sealing should use galvanized sheet metal, 1/4-inch mesh hardware cloth, or steel wool, and that rats can chew through expanding foam and similar fillers.
That's why cosmetic patching fails. It covers a hole. It doesn't create a durable barrier.
Where to inspect after remediation
Focus on the transitions where building systems meet the shell.
- Utility penetrations: electrical, plumbing, and drain lines entering walls or foundations
- Door bottoms and thresholds: especially garages, side doors, and service entries
- Soffits and roof vents: overlooked because they're high and out of daily view
- Crawl space and attic vents: frequent weak points when screens are damaged
- Chimney and roofline openings: accessible routes for climbing rodents
Materials that work and materials that don't
A durable exclusion plan uses chew-resistant materials and proper fastening. Common failures usually involve shortcuts.
| Material or approach | Result |
|---|---|
| Galvanized sheet metal | Strong option for larger openings and behind-access voids |
| 1/4-inch hardware cloth | Effective for vent and opening protection when installed correctly |
| Steel wool with sealant support | Useful in select gaps when properly backed and protected |
| Expanding foam alone | Commonly fails because rats can chew through it |
Moisture management matters too. Damp crawl spaces, leaking penetrations, and soft building materials make a structure easier to occupy. If crawl space humidity is part of the picture, a practical companion resource is this guide on how to fix crawl space moisture permanently, because exclusion works better when the environment is less hospitable.
One more trade-off deserves attention. Sealing only the obvious hole near the nest rarely solves the full problem. The better approach is whole-structure exclusion, with special attention to hidden gaps, service penetrations, and protected voids.
Navigating Costs Insurance and Hiring a Certified Service
Most homeowners ask two questions right away. Will insurance help, and how do I know who to trust?
Both questions matter because biohazard work isn't just about removal. It's about documentation, compliance, and whether the provider understands contamination control well enough to protect your family and your claim.
What to look for in a remediation company
A credible provider should be able to explain its process in plain language. Ask how they assess contamination boundaries, what materials they remove versus clean, how they handle waste, and what documentation they provide at the end.
Look for signs of a disciplined operation:
- Detailed scope of work: not a vague promise to “sanitize everything”
- Clear worker protection protocols: PPE, containment, and controlled removal should be standard
- Written documentation: especially post-work reporting
- Insurance familiarity: they should know how to support homeowner documentation without guessing at coverage
A good starting point is understanding what qualifies a legitimate biohazard remediation company and how that differs from general cleaning or basic pest service.
Red flags homeowners should take seriously
Be cautious if a company:
- Pushes immediate tear-out without assessment
- Offers a quick spray-only solution
- Can't explain decontamination chemistry or clearance documentation
- Uses pressure tactics instead of education
The estimate should describe the contaminated zones, the handling plan, the likely material removal, and the verification process. If it doesn't, you're not looking at a serious remediation scope.
Insurance coverage can vary by policy and cause of loss, so no reputable company should promise blanket coverage. What a strong provider can do is help you present the situation clearly, supply records, and communicate the extent of contamination and necessary work in a format carriers can evaluate.
The right service partner lowers stress because they don't just clean. They document, explain, and advocate responsibly.
When rat nests in houses leave contamination behind, the safest next step is professional guidance that addresses both the health hazard and the structure itself. 360 Hazardous Cleanup provides compassionate, compliant biohazard remediation with a focus on containment, documentation, and family safety, helping property owners move from discovery to a restored environment.