You notice it when the bathroom is quiet. A dark line in the caulk. Gray spotting on grout you just cleaned. A musty smell that seems to return no matter what spray you use.
That moment usually triggers the same question. Is this a simple cleaning job, or is something bigger happening behind the surface?
For most homeowners, shower mold and mildew removal starts as a cosmetic concern and quickly becomes a moisture problem. That's the part many guides miss. If growth keeps returning, the issue often isn't that you chose the wrong cleaner. It's that the bathroom stays wet long enough for spores to settle back in. A safe response starts with identifying what you're seeing, cleaning only what can be cleaned effectively, and knowing when visible growth is a warning sign rather than a stain.
Is It Mold or Mildew in Your Shower?
If you're staring at discoloration in a shower, your concern is reasonable. In day-to-day conversation, people use mold and mildew interchangeably. In practice, the distinction matters because it helps you judge whether you're dealing with a light surface problem or signs of moisture moving deeper into the assembly.
What mildew usually looks like
Mildew in a shower often appears as a flat, powdery, or lightly fuzzy film. It tends to show up on grout lines, corners, silicone edges, shower curtains, and areas where soap residue and moisture sit together. Many homeowners first notice it as gray or white spotting, then later as darker staining if it isn't removed.
Mildew is often more superficial. That doesn't mean you should ignore it. It means the cleanup may stay in the DIY category if the affected surface is hard, nonporous, and the growth isn't spreading into surrounding materials.
What mold tends to signal
Mold often looks darker, thicker, or wetter than mildew. It may appear black, green, or blue, and it can look slimy or matted instead of dusty. When it shows up around failed caulk, softened drywall, swollen trim, or cracked grout, it raises a different concern. Water may be getting behind the finished surface.
Practical rule: If the growth wipes off easily from tile or glass but keeps returning, think humidity first. If the material beneath it feels soft, swollen, or crumbly, think water intrusion.
That distinction matters because recurring bathroom growth is often a moisture management failure, not just a cleaning failure. The EPA notes that mold can often be prevented when wet or damp materials are dried within 24 to 48 hours and indoor humidity is kept below 60%, ideally between 30% and 50%, as summarized in EPA-aligned bathroom mold prevention guidance.
Clues that point beyond the visible spot
Use these simple checks before you grab a brush:
- Surface check: Hard tile, metal, and glass usually support surface growth that can often be cleaned.
- Material check: Caulk, drywall, painted trim, and backing materials can trap moisture and hide deeper contamination.
- Recurrence check: If you clean an area and it returns quickly, the shower may have a ventilation or leak issue.
- Odor check: A musty smell that lingers after cleaning often means something remains damp out of sight.
If the stain is dark and you're worried about what it means, this overview of black mold on walls helps explain why appearance alone isn't enough to judge the true scope.
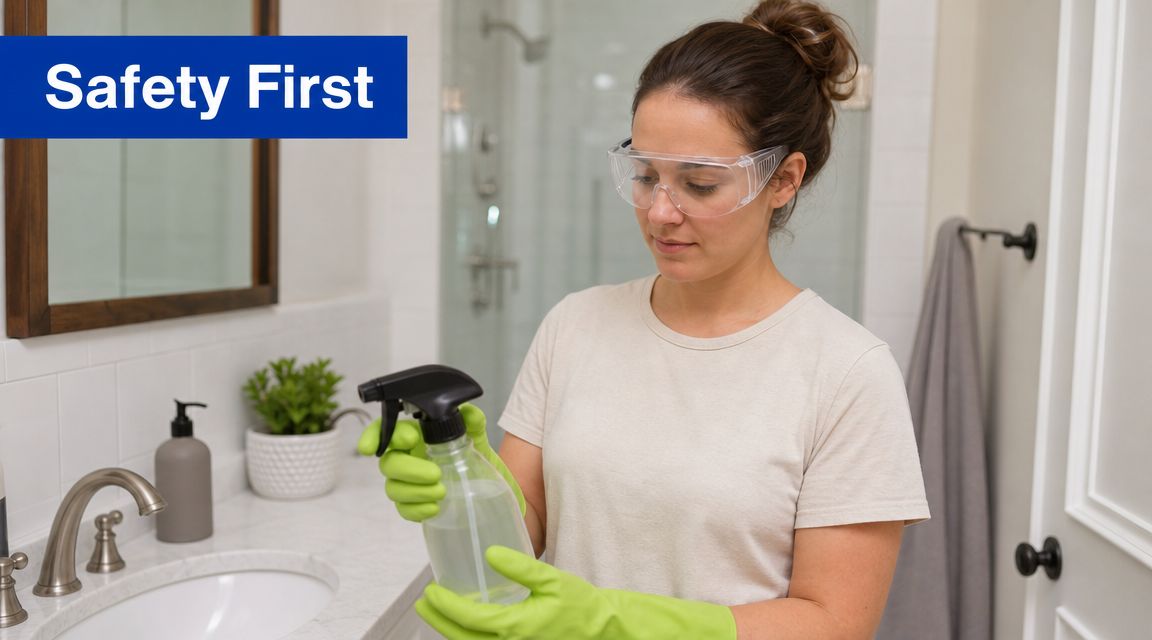
Essential Safety Gear and Area Preparation
Cleaning even a small patch without protection is a mistake. Shower growth can release spores when you scrub, and some cleaning products can create dangerous fumes if they're used carelessly. Safety isn't an extra step. It's the foundation of the job.
What to wear before you start
For a small shower cleanup, use protective gear that keeps spores and chemicals off your skin, out of your eyes, and away from your lungs.
- Non-porous gloves: Nitrile or similar gloves help protect against both cleaning solution contact and contaminated residue.
- Eye protection: Sealed goggles or close-fitting safety glasses reduce the risk of splash exposure.
- Respiratory protection: An N95 respirator is a sensible baseline when scrubbing visible growth.
- Clothing you can wash promptly: Long sleeves are helpful when you're working overhead or around spray.
A lot of homeowners underestimate the PPE part because the job looks small. The risk changes fast once brushing starts and particles become airborne. That's why professional crews treat protective equipment as part of the remediation itself, not an accessory. If you want a clearer sense of that standard, this guide on the importance of personal protective equipment in biohazard cleanup explains the reasoning well.
How to prepare the bathroom
Good prep prevents a manageable task from becoming a mess.
First, increase airflow. Run the exhaust fan and, if the bathroom has a window, open it. Keep the door positioned to support ventilation without blowing contaminated air through the house. You want steady air exchange, not aggressive airflow that spreads debris.
Next, remove loose items from the work zone. Take out towels, bath mats, toothbrushes, soaps, and fabric items that can collect spray or spores. If a shower curtain liner is heavily affected, set it aside for separate evaluation instead of brushing it in place.
Keep children, pets, and anyone with respiratory sensitivity away from the bathroom until cleaning is complete and surfaces are dry.
Set your tools within reach before mixing anything. A soft scrub brush, old toothbrush for corners, microfiber cloths, detergent, clean water, and a trash bag for disposable items are usually enough for a small hard-surface job. The goal is controlled cleaning, not aggressive demolition.
Your Guide to Effective Shower Mold Removal
The most reliable shower cleanup starts with a simple principle. Remove the growth from the surface, then remove the moisture that let it grow there. If you skip either part, you're likely to see it again.
For hard, nonporous surfaces, the EPA's baseline method is straightforward: scrub with detergent and water, then dry completely, as outlined in EPA mold cleanup guidance. That sounds basic because it is. The hard part is doing it thoroughly and stopping before you damage materials that shouldn't be scrubbed.
Start with the right surface judgment
Tile, sealed glass, metal fixtures, and many acrylic shower surrounds can usually handle careful cleaning. Porous or absorbent materials are different. If mold has worked into drywall, unsealed grout, backing materials, or soft caulk that has started to fail, cleaning may only remove the surface staining while leaving contamination behind.
That is why experienced remediators pay attention to what the mold is growing on, not just what color it is.
The cleaning sequence that works
Begin by wetting the area lightly so dry debris doesn't scatter when you disturb it. Apply detergent and water first, especially if soap scum or body oil is present. That film can block the cleaner from reaching the growth underneath.
Then scrub with enough force to break the biofilm without shredding the surface. Corners, grout joints, and the seam where tile meets caulk usually need a smaller brush and more patience than the flat wall does. Wipe away loosened residue instead of pushing it around.
If you're using bleach on a suitable hard, nonporous area, use only a properly diluted solution. Clorox recommends ⅓ cup per gallon of water, keeping the surface visibly wet for 10 minutes, then rinsing and drying. For a bleach cleaner spray, it specifies 5 minutes of visible wet contact time. It also warns never to mix bleach with vinegar, ammonia, or other cleaners because the fumes can be dangerous. That contact-time detail matters. Many failed cleanups happen because the product is sprayed and wiped away too quickly.
Short contact time leads to disappointing results. The surface has to stay wet long enough for the product to do its work.
Rinse after treatment, then dry the shower completely. If a towel leaves moisture behind, follow with airflow. Surface dryness is part of the remediation, not the last cosmetic touch. If your issue extends upward, this companion guide on how to permanently remove mold from a bathroom ceiling is useful because ceiling growth often points to the same ventilation problem.
Comparing common shower mold cleaning agents
| Agent | Best For | How to Use | Safety Warning |
|---|---|---|---|
| Detergent and water | Routine surface growth on hard, nonporous materials | Scrub thoroughly, wipe away residue, dry completely | Don't assume cleaning is complete if moisture remains |
| Diluted bleach solution | Stubborn discoloration on suitable hard, nonporous surfaces | Mix ⅓ cup per gallon of water, keep wet for 10 minutes, then rinse and dry | Never mix with vinegar, ammonia, or other cleaners |
| Bleach cleaner spray | Smaller targeted spots on suitable hard surfaces | Keep surface visibly wet for 5 minutes, then follow label directions | Avoid combining with any other product |
Some homeowners also prefer to review a local housekeeping perspective before they begin. This practical post from Shiny Go Clean Madison for mold removal is a helpful example of how regular maintenance and removal can work together.
If you're beyond a simple wipe-down and the bathroom has persistent contamination, 360 Hazardous Cleanup is one professional option for mold remediation and environmental cleanup when the problem moves past routine housekeeping and into material failure, recurrence, or hidden moisture.
Preventing Future Mold and Mildew Growth
Most repeat shower problems are won or lost after the cleaning is over. You can scrub a shower until it looks perfect, but if the room stays humid and wet, spores get another opportunity.
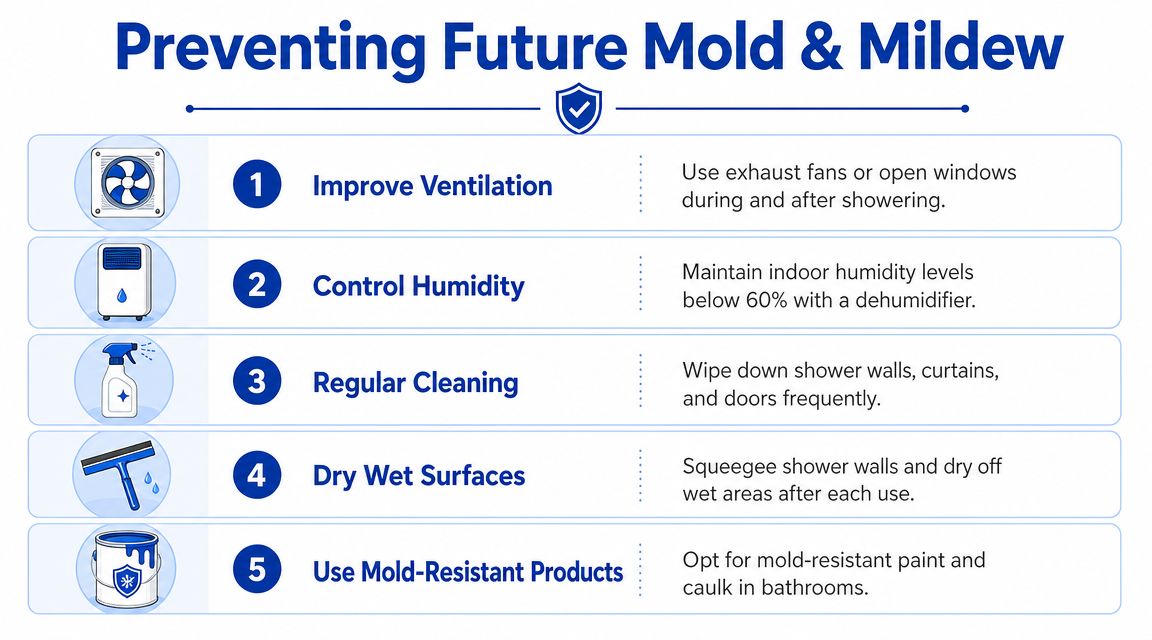
The EPA's guidance is clear on the larger principle. Mold can usually be prevented if wet or damp materials are dried within 24 to 48 hours, and indoor relative humidity should stay below 60%, ideally between 30% and 50%, according to the EPA's mold and moisture guidance.
Build a bathroom routine that removes moisture fast
The strongest prevention plan is simple enough to repeat every day.
- Run the exhaust fan: Use it during showering and for at least 30 minutes afterward.
- Dry wet surfaces: A squeegee on tile and glass removes the water film mold depends on.
- Watch the weak points: Caulk lines, corners, and the lower edge of shower doors trap moisture longer than open wall areas.
- Fix drips promptly: A small plumbing leak can keep one area damp even when the room looks clean.
This short video gives homeowners a visual overview of practical prevention habits.
Think of recurrence as a building clue
When shower mildew keeps coming back, the question isn't only "What should I clean with?" The better question is "What is staying wet here?" Sometimes the answer is poor fan performance. Sometimes it's condensation on cold surfaces. Sometimes it's failed caulk or a leak at a fixture, niche, or wall penetration.
A recurring shower problem is often a humidity story with a cleaning symptom.
That's why long-term prevention depends on both housekeeping and building conditions. This broader resource on understanding mold prevention and mitigating risks for healthier homes is worth reading if your shower issue seems tied to the room, not just the surface.
When to Call a Professional Mold Remediation Service
A homeowner can handle many small hard-surface shower issues safely. Wisdom is knowing when the job has crossed the line from cleaning into remediation.
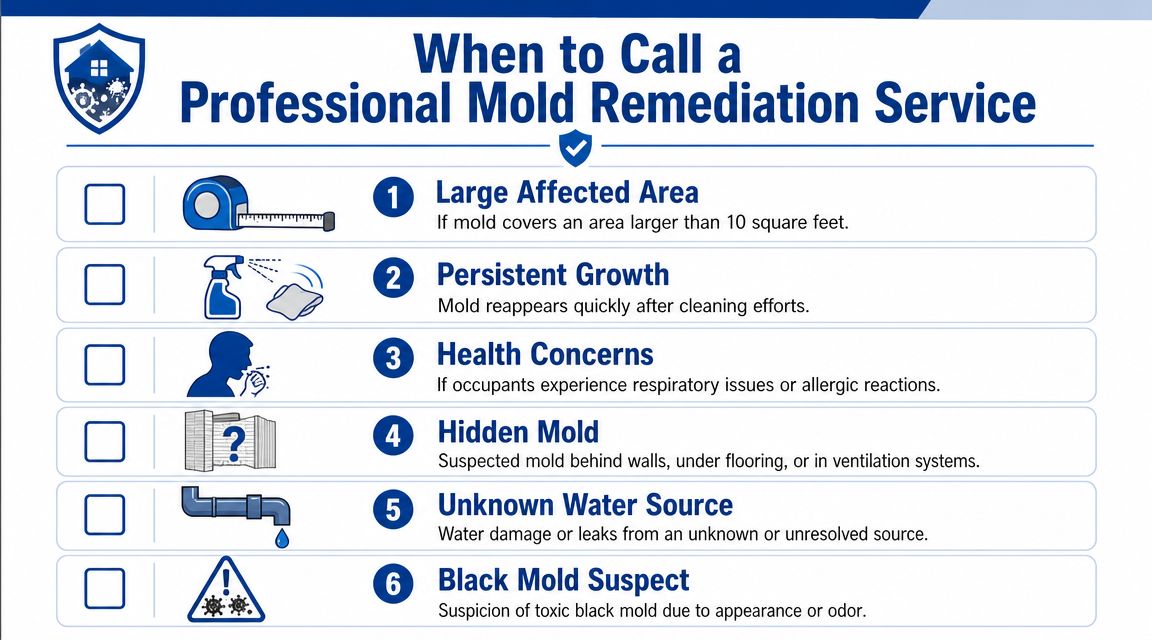
Red flags that change the decision
These conditions usually justify a professional assessment:
- Larger affected area: If visible mold covers more than 10 square feet, the situation has moved beyond a minor spot-cleaning task.
- Porous material involvement: Drywall, subflooring, insulation, framing, and deteriorated caulk or grout can hold contamination below the surface.
- Fast recurrence: If growth returns quickly after careful cleaning and drying, the source problem likely hasn't been found.
- Musty odor after cleanup: Lingering odor often suggests hidden moisture or concealed growth.
- Sensitive occupants: If someone in the home has respiratory issues or is immunocompromised, the margin for DIY error is much smaller.
- Unknown water source: If you can't tell where the moisture is coming from, cleaning alone won't solve it.
What professionals do differently
Professional remediation isn't just stronger chemicals. It involves containment, controlled removal, air management, source identification, and safe handling of affected materials. If material has to be opened, removed, or isolated, the goal is to prevent cross-contamination while correcting the moisture problem that caused the growth in the first place.
That professional lane exists for a reason. Fact.MR estimates the global mildew remover market reached US$813.4 million by the end of 2023, and projects the U.S. market at US$167.2 million in 2024 with an 8.0% CAGR through 2034, according to Fact.MR's mildew remover market analysis. Those figures reflect a practical reality. Mold cleanup sits between cleaning, indoor air quality, and building maintenance.
For homeowners comparing safe handling advice before they make that call, this article on how to safely remove mold offers another useful perspective on where DIY ends and specialist work begins. If the signs above fit your situation, this page on when you need professional mold remediation outlines the next step more clearly.
Protecting Your Home and Health from Mold
A small amount of shower growth on a hard surface is often manageable. The key is to identify it, clean it safely, and dry the area thoroughly afterward. The deeper lesson is that recurring shower mold and mildew removal is rarely just about the cleaner. It's about moisture.
If the problem is limited, you can often address it with care and good habits. If it keeps returning, affects porous materials, or makes the bathroom smell damp even after cleaning, getting professional help is the safer decision for both the home and the people living in it.
If shower mold has moved beyond a simple surface issue, 360 Hazardous Cleanup provides professional remediation and environmental cleanup support with a strong focus on safety, compliance, discretion, and compassionate guidance during stressful situations.