
Finding blood in your car changes the feel of the whole moment. Sometimes it’s a child’s nosebleed on the way home. Sometimes it’s a cut finger after loading equipment, or a minor accident that left more mess than expected. And sometimes the circumstances are heavier than that, which is exactly why blood in a vehicle should be handled with more care than an ordinary upholstery stain.
Most online advice jumps straight to household cleaners. That helps only if the incident is small, recent, and clearly limited to the surface. A better first question is simpler: Are you dealing with a stain, or a biohazard event? That distinction matters because a car seat can hold contamination below what you can see, especially in seams, padding, and nearby surfaces.
Responding to Blood in Your Vehicle
The first few minutes matter, but panic usually makes cleanup worse. People scrub too hard, grab hot water, or start mixing products they already have under the sink. That often spreads the stain, damages the upholstery, or creates unnecessary exposure.

A calm response starts with containment. Keep other passengers away from the affected area. If the blood is still wet, stop it from transferring to consoles, belts, clothing, or door panels. If you need a consumer-oriented cleaning reference for a minor surface incident, these mobile detailing tips for blood stains are useful for basic stain work, but they should be read through a safety lens.
Stain or biohazard event
A minor stain is usually small in volume, from a known source, and visibly confined to one area of the seat surface.
A biohazard event is different. It may involve a larger amount of blood, an unknown source, trauma, cross-contamination to multiple surfaces, or any situation where fluids may have reached the seat foam or vehicle interior systems.
Practical rule: If you can’t say with confidence where the blood came from, how much soaked in, and what else it touched, treat it as a contamination problem first and a cleaning problem second.
For readers who want a more formal overview of safe handling, blood spill cleanup procedures for contaminated areas explain the standard of care more clearly than typical stain-removal articles.
That’s the frame to keep in mind throughout this guide. If the incident is minor and recent, careful DIY cleaning may be reasonable. If it isn’t, the safest decision is to stop before you spread contamination deeper into the vehicle.
Safety Precautions and Essential Supplies
Before you reach for a towel, decide whether you are handling a small surface cleanup or stepping into contamination control. That distinction changes what you wear, what you use, and whether DIY cleaning is still a safe option.
Blood exposure carries real infection risk. In a vehicle, the problem is not limited to the visible spot on the seat. Hands, door pulls, buckles, stitching, and absorbent foam can all become part of the cleanup if you work carelessly.
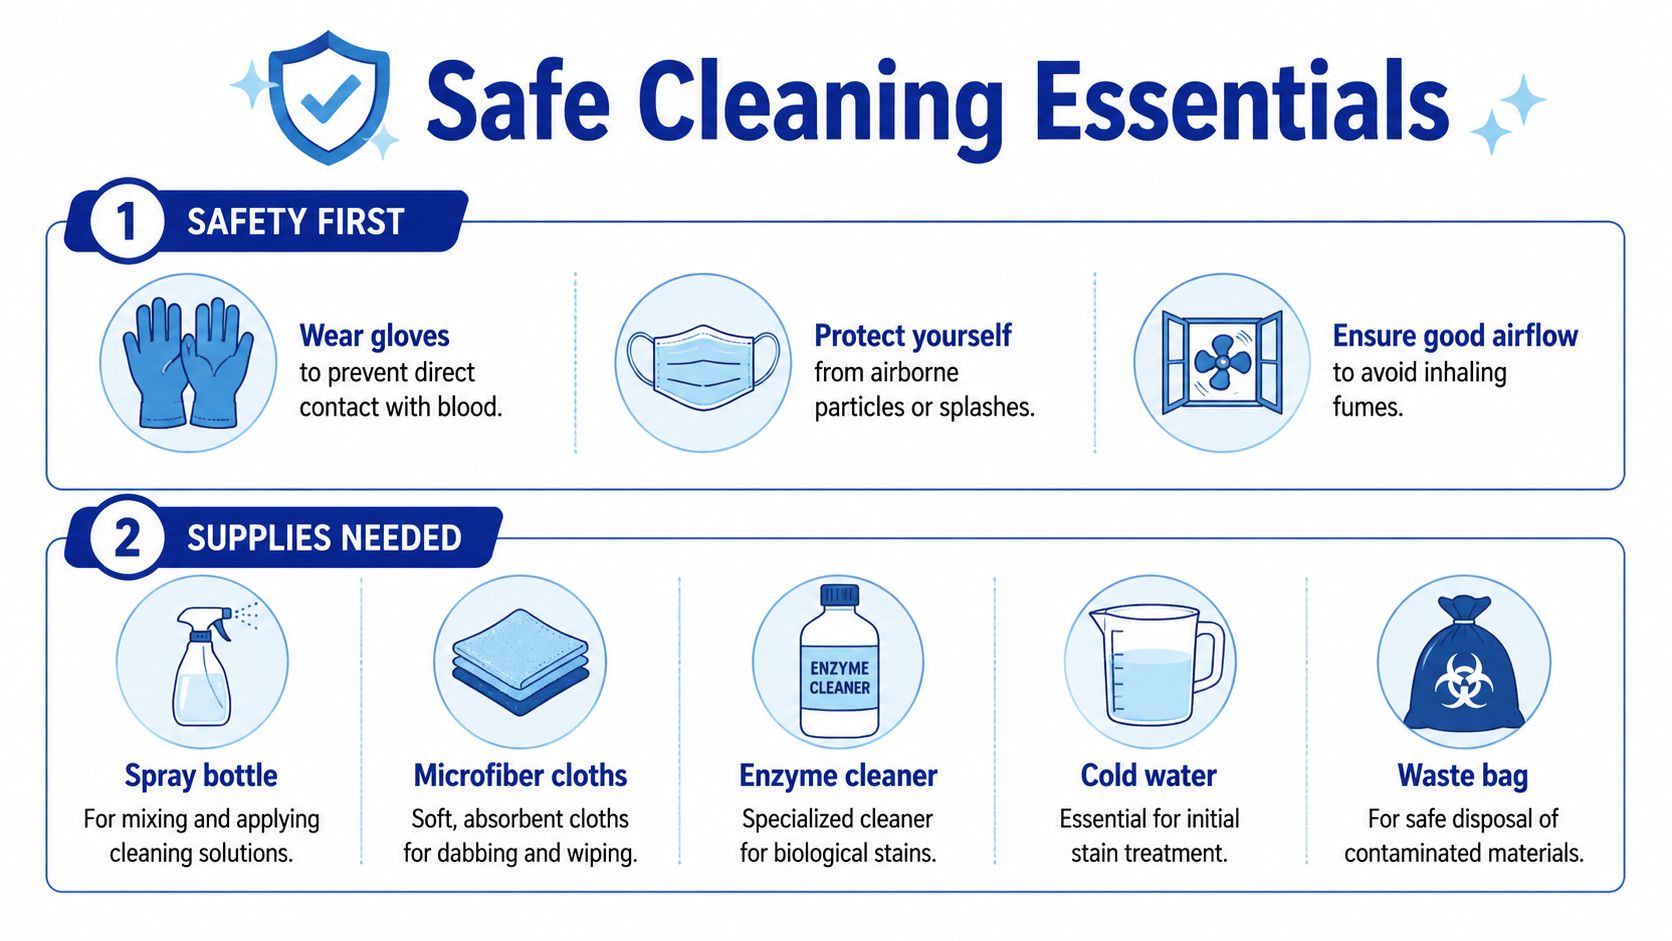
What to wear before you start
For a small incident from a known source, wear basic barrier protection and keep the vehicle ventilated. PPE standards used in biohazard cleanup explain the logic clearly. The goal is simple. Protect skin, protect eyes, and avoid spreading contamination to clean areas of the car.
Use:
- Disposable gloves. Nitrile is a good choice because it resists tears better than thin food-service gloves.
- Eye protection. Useful if you are blotting, spraying cleaner onto a cloth, or working in a tight cabin where splashback is possible.
- A mask if chemicals or odor are a factor. A basic face covering does not replace proper respiratory protection for a serious biohazard event, but it can reduce nuisance exposure during minor surface cleaning.
- Open doors or windows. Fresh air helps with cleaner fumes and keeps the work area easier to tolerate.
If any item on that list feels excessive, stop and reconsider the job. Minor stain work should feel controlled. If it does not, the incident may be larger than it first appeared.
What to gather
Use supplies that lift blood without setting the stain or pushing liquid deeper into the cushion. The right setup is modest, but each item has a clear purpose. Shops that handle car seat restoration for detailers use the same basic principle. Match the product to the material, keep moisture controlled, and avoid creating a deeper contamination problem while chasing a cleaner surface.
| Item | Why it helps | Best use |
|---|---|---|
| Disposable gloves | Reduces direct contact and cross-transfer | Every cleanup |
| Cold water | Helps loosen fresh blood without heat-setting proteins | First response |
| White microfiber cloths or paper towels | Lets you blot and monitor transfer without dye bleed | Fresh and dried stains |
| Mild soap | Handles light residue after initial removal | Surface follow-up |
| Enzymatic cleaner | Breaks down biological residue on suitable fabrics | Dried or stubborn spots |
| Trash bag | Contains used gloves, towels, and other waste | Disposal |
A few cautions matter here. Do not use hot water. Do not spray large amounts of liquid straight into the seat. Do not mix cleaners unless the label specifically permits it.
Stop signs before DIY
Some conditions move this out of the stain-removal category.
- Unknown source. You cannot verify whose blood it is or what caused the bleeding.
- Heavy saturation. The seat is wet below the surface, or liquid may have reached the foam.
- Spread beyond one contact point. Blood is on belts, trim, handles, carpeting, child-seat hardware, or nearby surfaces.
- Trauma or accident context. The blood is connected to a serious injury, violent event, or unattended medical emergency.
In those cases, cleaning the visible area is not enough. The job may involve hidden absorption, regulated disposal, and disinfection steps that consumer products and ordinary detailing methods do not fully address.
How to Clean Blood from Fabric Car Seats
Fabric seats are where challenges often arise. The surface looks simple, but woven upholstery grabs protein stains quickly and holds them below the visible top layer.
Blood stains represent one of the most challenging protein-based contaminants, with success rates dropping significantly if not addressed within hours. Heat exposure causes blood proteins to denature and bond with upholstery, making the stain 70-80% harder to remove after the first 4-6 hours. That’s why the answer to how to get blood out of car seat fabric always starts with one rule. Use cold water, not warm or hot.
Fresh blood on fabric
If the blood is still wet, work gently and keep pressure controlled.
- Blot first. Use a white cloth or paper towel and press straight down. Don’t rub in circles. Rubbing spreads the blood and drives it deeper into fibers.
- Apply cold water sparingly. Dampen a clean cloth with cold water and blot again. The goal is to lift, not soak the cushion.
- Repeat with clean sections of cloth. Once part of the cloth is stained, rotate to a clean area so you’re not redepositing blood.
- Use mild soap only after the initial lift. A small amount on a damp cloth can help remove residue, but don’t oversaturate the seat.
- Blot dry. Press with a dry towel to pull moisture back out.
Dried blood on fabric
Dried stains need patience. Scrubbing a set stain usually frays the fabric before it removes the blood.
Start by lightly dampening the area with cold water to soften the residue. Then apply an enzymatic cleaner according to its label directions. These products are designed to break down biological material rather than just mask it.
If the stain lightens but doesn’t disappear, that usually means some contamination remains below the visible surface. More force isn’t the answer. Better chemistry and controlled extraction are.
Let the cleaner dwell, then blot. Repeat if needed, but stop if the fabric begins to fuzz, lighten unevenly, or stay wet for too long.
For readers comparing upholstery methods more broadly, this guide to car seat restoration for detailers offers useful context on seat materials and deep-cleaning limits.
A related household surface method is also covered in removing bloodstains from carpet and similar fibers, which can help you understand why blotting and controlled moisture matter.
Here’s a visual walkthrough for general cleaning technique:
What doesn’t work well
Some of the worst results come from methods people assume are stronger.
- Hot water sets the protein stain.
- Aggressive brushing damages the weave and spreads the spot.
- Overwetting pushes contamination into foam and slows drying.
- Mixing cleaners can damage the seat and create fumes in a confined cabin.
For minor incidents, a careful cleanup may be enough. For anything that soaked through, one option is to move beyond consumer stain care and consult a trained remediation provider such as 360 Hazardous Cleanup, especially when surface cleaning no longer matches the actual contamination risk.
Special Guidance for Leather and Vinyl Seats
Leather and vinyl change the problem. They usually absorb less than fabric at the top surface, but they’re easier to discolor, dry out, or strip if you use the wrong product.
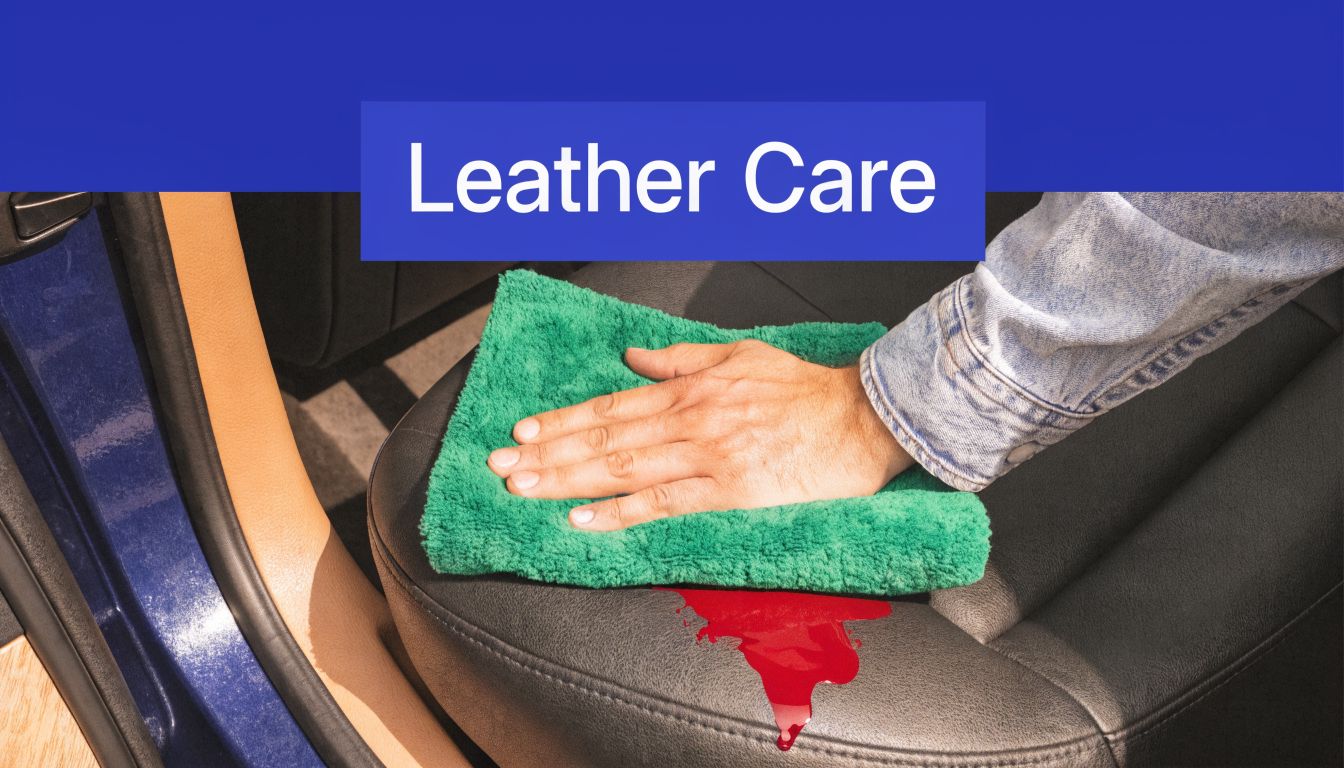
What to use on leather
For finished automotive leather, start with a clean microfiber cloth dampened with cold water. Blot and wipe gently. If residue remains, use a pH-neutral leather cleaner made for automotive interiors. Test it first on a hidden area near the lower seat edge.
Don’t assume a common fabric remedy is safe on leather. Products that can help on cloth may damage dyes, flatten the finish, or leave pale spots on leather.
Gentle removal is the goal. If you remove the stain but ruin the finish, the seat still needs restoration.
After cleaning, use a leather conditioner that matches the material type. This helps restore moisture and reduces the dry, chalky look harsh cleaning can cause.
Vinyl needs a lighter touch than most people think
Vinyl is more forgiving than leather, but it can still haze or discolor if you use abrasive pads, stiff brushes, or solvent-heavy products. A mild interior-safe cleaner on a microfiber towel is usually enough for a small surface incident. Wipe, lift, and change to a clean section of cloth frequently.
Seams and perforations are the risk points
Leather and vinyl seats often have stitching, perforations, piping, and panel joins. That’s where contamination can slip below the visible surface.
Use this quick check before deciding the problem is solved:
- Inspect stitching lines for dark residue that remains after wiping.
- Check perforated panels closely. Small holes can carry fluid below the top layer.
- Press lightly on the cushion. If moisture resurfaces, the issue isn’t only on top.
- Notice odor changes after cleaning. A persistent biological smell suggests deeper contamination.
If the seat has perforated leather, ventilated seating, or blood pooled along seams, surface cleaning may improve appearance without resolving the actual hygiene issue.
When to Call a Biohazard Remediation Professional
A few drops from a nicked finger are one kind of problem. Blood from a crash, assault, medical emergency, or unknown source is another. At that point, the question shifts from stain removal to exposure control.
Many articles focus on what you can still see on the seat. In practice, the harder part is what may have moved into foam, seams, belts, carpet edges, or nearby trim. Once there is enough blood to soak, spread, or come from an incident with uncertain health status, household cleanup stops being a detailing task and starts becoming a contamination issue.
Call a professional if any of these apply:
- The amount is more than minor. It is more than a few drops or a small, contained smear.
- The source is unknown or tied to trauma. This includes crashes, fights, self-harm, medical events, and unattended death scenes.
- Blood soaked below the surface. If padding, foam, or underlayers are affected, surface cleaning does not address the full problem.
- Contamination reached other areas. Seat belts, buckle receivers, carpet, consoles, door panels, child seats, and hard-to-reach gaps can all retain residue.
- Odor remains after you clean. Persistent biological odor usually means material is still present.
- You cannot handle waste safely. Gloves, towels, absorbents, and removed materials may need careful bagging and disposal.
There is also a practical line many DIY guides skip. If the event could expose you to another person’s blood, you need to think about protective equipment, cross-contamination, and disposal before you think about appearance. A cleaner can lighten a stain. It cannot confirm that porous material is sanitary.
For a clearer standard, signs biohazard cleaning is needed explains when a vehicle cleanup has crossed into professional-response territory.
When blood has moved beyond a wipeable surface, the question isn’t whether you can make the seat look better. It’s whether you can make the vehicle safe.
The Professional Cleanup and Restoration Process
Professional remediation starts with assessment, not guesswork. The technician determines where contamination is visible, where it may have traveled, what materials are affected, and whether any part of the vehicle needs containment before cleaning begins.
What the process usually includes
A proper vehicle biohazard response often involves several layers of work:
- Controlled evaluation of seats, seams, floor areas, belts, trim, and nearby compartments
- Containment measures to prevent spreading contamination during removal
- Physical removal of affected material and contaminated disposable items
- Cleaning and disinfecting of hard and soft surfaces using products appropriate to the material
- Odor treatment when biological residue has affected the cabin environment
- Compliant waste handling so contaminated materials are bagged, transported, and disposed of correctly
What clients usually need most
People often need more than cleaning. They need discretion, a clear explanation of what happened to the vehicle, and documentation they can use for insurance or property records.
That’s why a structured biohazard cleanup process for safety and restoration matters. It gives you a way to restore the vehicle without relying on trial and error, and without putting yourself in the middle of a risk that should be handled by trained personnel.
A minor, fresh stain from a known source may be manageable with careful DIY cleaning. Anything beyond that deserves a professional standard of care.
If you’re dealing with blood in a vehicle and you’re not sure whether it’s a stain issue or a biohazard situation, 360 Hazardous Cleanup can help you make that call. Their team handles blood and bodily fluid contamination with attention to safety, regulatory compliance, discretion, and practical next steps, including guidance when a vehicle needs full remediation rather than surface cleaning.