Most residential mold remediation projects take 1 to 5 days. If the mold is widespread, involves complex building systems, or affects a commercial property, the work often stretches to 1 to 2 weeks.
If you’re reading this right after finding mold on a wall, around a vent, or after a leak, you probably want a straight answer and a realistic sense of what happens next. That concern is normal. Mold problems feel urgent because they affect both the building and the people using it, and the biggest frustration for many owners is not knowing whether this is a one-day cleanup or a longer disruption.
The good news is that mold remediation is a structured process, not guesswork. Once you understand why each step happens, the timeline stops feeling like a black box. It starts to make sense. If you want a broader primer on what remediation involves beyond timing, this overview of mold remediation for health and home protection is a useful companion.
Understanding Your Mold Remediation Timeline
You spot mold near a baseboard after a leak, call a remediation company, and expect the answer to be simple. How many days? The honest answer depends on what the crew finds, because a mold timeline is shaped by safety, moisture control, and how far the problem has spread.
A professional team is not only cleaning a visible patch. They are also preventing spores from reaching clean rooms, tracing the water source that fed the growth, checking whether nearby materials are affected, and making sure the area is dry enough to stay clean after the work is done. Mold remediation works a lot like surgery on a building. The visible issue matters, but the hidden conditions often control the schedule.
That is why two jobs that look similar on the surface can move at very different speeds.
Why the timeline can change from one property to another
A small, open area with easy access may be handled fairly quickly. A larger loss, a leak inside a wall, contamination around HVAC components, or wet materials that need time to dry will usually add days because each step has a specific purpose.
Property owners often ask why the team cannot remove the mold and leave. The short answer is that mold returns when moisture remains, and cross-contamination happens when disturbed material is not contained correctly. What looks like a delay is often the part that protects the rest of the property.
If you want a broader explanation of what the work includes beyond scheduling, this guide to mold remediation for health and home protection gives helpful context.
What the timeline is actually measuring
When owners and managers ask, "how long does mold remediation take," they are usually trying to pin down three different timelines at once:
How long the affected area will be restricted
Access depends on containment, air cleaning, drying time, and whether damaged materials need to be removed.How long the crew will actively be on site
Some parts of the job are hands-on, while others involve monitoring equipment, waiting for materials to dry, or confirming conditions are acceptable.How long until the space can be used with confidence
That point comes after the area is cleaned, dry, and ready for repairs or normal occupancy, depending on the scope of work.
Those distinctions matter because they explain why a project can feel inactive for part of the day even when progress is being made. Drying, filtration, and verification are doing work even when no one is cutting drywall or carrying debris outside.
A good timeline should answer more than "when will this be over?" It should also explain why each phase is there, what the crew is watching for, and what has to be true before the next step begins. That knowledge helps owners ask better questions, set realistic expectations, and stay involved in the process instead of feeling shut out.
A Phase-by-Phase Breakdown of the Remediation Process
You open a utility closet or pull furniture away from a wall, and the question hits right away: what happens now, and why does it take as long as it does? A sound remediation plan should answer both. Good crews are not just removing visible growth. They are controlling where contamination can travel, identifying why it formed, and making sure the space is dry enough to stay stable after the job is done.
That is why remediation follows a sequence. It works much like a medical procedure for a building. First, the team identifies the problem. Then they isolate it, remove what cannot be saved, clean what can be saved, dry the area, and confirm the space is ready for repair or use. If you are trying to make sense of visible staining or spotting on interior finishes, this guide to black mold on walls explains why what shows on the surface is only part of the picture.
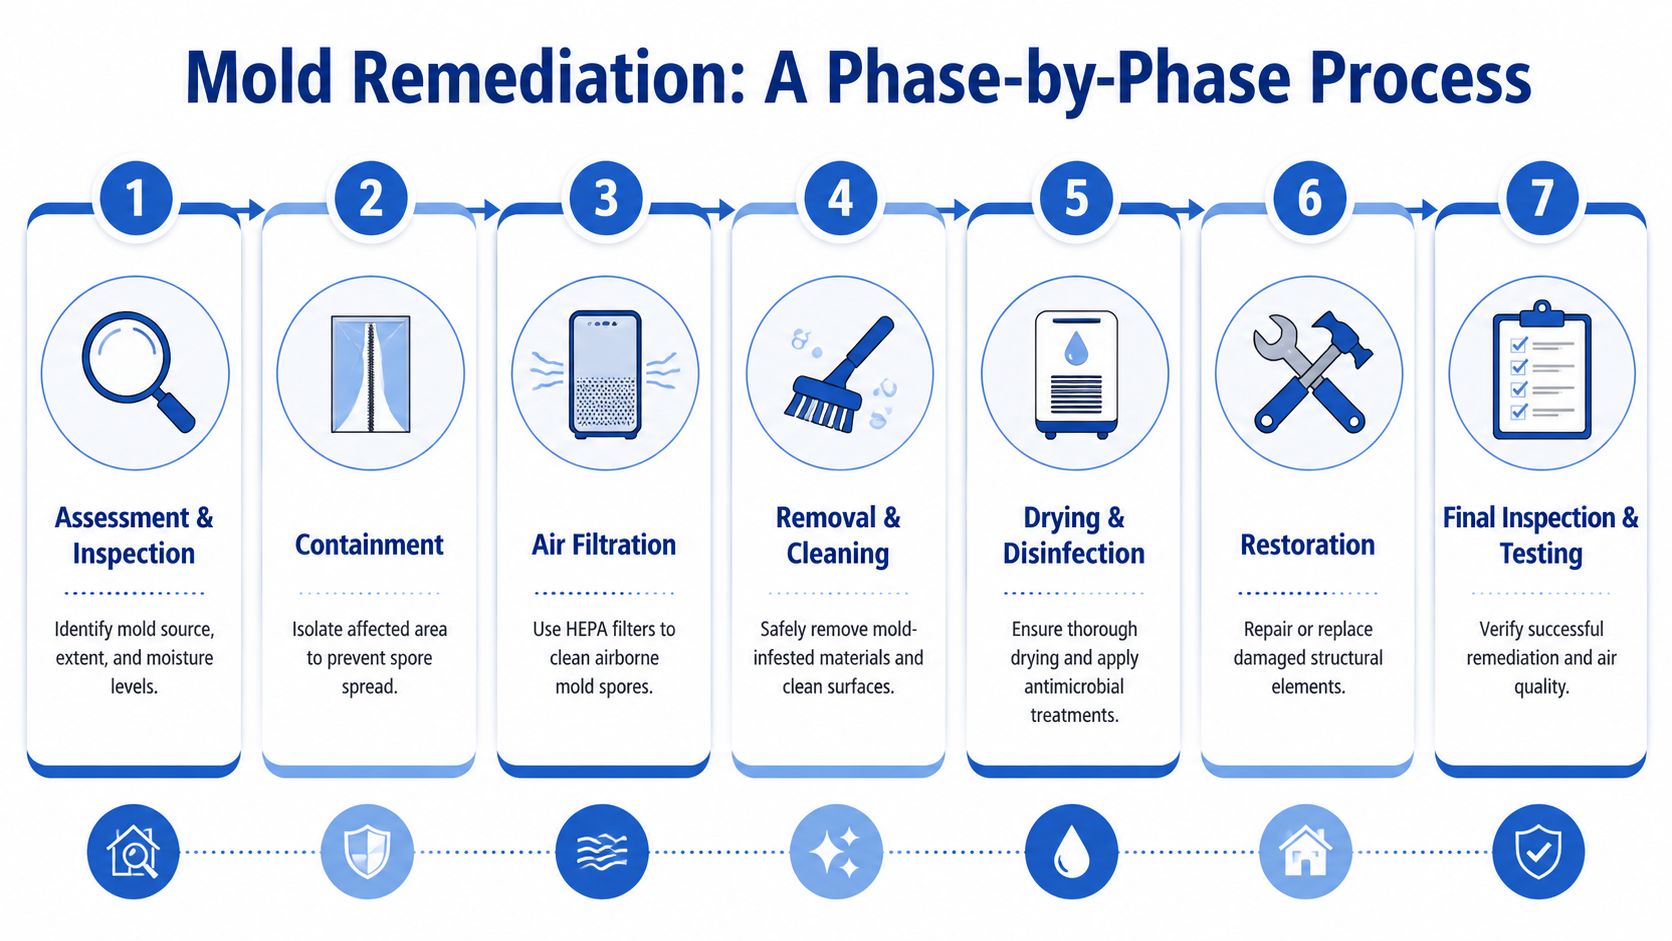
Assessment and inspection
The first phase defines the scope of the problem. A remediation team checks visible growth, looks for the moisture source, tests surrounding materials for dampness, and considers whether mold may be present in hidden cavities, under flooring, or around HVAC pathways.
Property owners sometimes want this step to move faster because little visible work happens at first. But this stage provides the project's direction. If the crew treats only the stain you can see and misses the wet insulation behind it, the job may look finished while the conditions that caused the growth are still in place.
Containment and air control
Once the scope is clearer, the affected area is isolated. Crews set up containment barriers and use air-control equipment to reduce the chance that spores and dust will spread into clean parts of the building during demolition and cleaning.
This phase often feels like setup. It is protection. Opening a wall without containment can turn one room with a mold problem into several rooms that need cleaning afterward.
A simple way to view containment is as the lid on a pot. Without that lid, disturbance inside the work area can escape into the rest of the property.
Containment protects the rest of the building while the problem area is being disturbed.
Removal of damaged material
After isolation is in place, the crew removes porous materials that are too damaged or contaminated to clean reliably. That can include sections of drywall, insulation, carpet pad, ceiling tile, or other materials that have stayed wet long enough for mold to grow into them.
The goal is source removal. Surface appearance can be misleading here. A material may look only lightly affected, but if mold has penetrated it and moisture remains, keeping it in place can slow the project and increase the chance of recurrence.
Some materials can be saved. Hard or less-porous surfaces may be cleaned with methods such as HEPA vacuuming and detailed surface cleaning, depending on the material condition and the scope of growth.
Cleaning and sanitizing
Once damaged material is out, the area still needs detailed cleaning. Fine particles, settled spores, and residue can remain on framing, nearby surfaces, and contents close to the work zone.
This is the part many owners find confusing. If the moldy drywall is gone, why is the crew still cleaning? Because removal handles the damaged source material, while cleaning addresses what spread around it. Both matter if you want the area returned to a clean condition rather than looking better from a distance.
Drying and dehumidifying
Drying is the step that changes the environment that allowed mold to grow in the first place. Air movers, dehumidifiers, and moisture monitoring help bring materials back toward acceptable dry conditions.
This phase can take patience. Machines may run for hours or days after demolition and cleaning are finished. That does not mean the job has stalled. It means the crew is waiting for the building materials to reach a condition where mold is less likely to return and repairs can be made without trapping moisture inside.
Restoration and final verification
The last phase depends on the scope of the loss. In some projects, remediation ends with a clean, dry cavity that is ready for a reconstruction contractor. In others, the same company may also replace drywall, insulation, trim, or finish materials. Some jobs also include final verification steps before the area is released for normal use.
For owners and managers, this is the point where the process should make sense as a whole. Each phase has a job, and each one supports the next.
| Phase | What happens | Why it matters |
|---|---|---|
| Assessment | Inspect growth, moisture, and possible hidden spread | Sets the actual scope and helps prevent missed areas |
| Containment | Isolate the work zone and control air movement | Reduces cross-contamination to nearby spaces |
| Removal | Remove materials that cannot be reliably salvaged | Eliminates damaged sources that can continue to harbor growth |
| Cleaning | Clean surfaces and residual contamination in and near the work area | Addresses settled spores and debris left after removal |
| Drying | Reduce moisture with equipment and monitoring | Helps return materials to stable conditions before repairs |
| Verification | Confirm the area is ready for re-use or rebuilding | Supports a safe, orderly closeout |
Example Timelines From Small Residences to Large Facilities
A parent finds a small patch of mold beside a shower before school. Across town, a facility manager discovers moisture damage in a warehouse section that serves daily operations. Both need remediation, but they should not expect the same calendar. The process is similar. The timeline is not, because each step has to match the size of the problem, the materials involved, and how the space is used.

Examples help make that difference easier to see. They also show why a crew may spend more time on one project than another, even when the visible mold does not look dramatically worse.
A small bathroom wall patch
A homeowner notices a localized area near a shower wall. The source looks clear, access is simple, and the affected materials seem limited.
A likely timeline looks like this:
Day 1
Inspection, moisture checking, containment, and targeted removal or cleaning. This happens first so the crew can confirm the mold is truly limited and keep disturbance from spreading particles into nearby rooms.Day 2
Detailed cleaning, drying, and a final review of the area. That final review matters because a small job is only small if the moisture issue has been corrected and the materials have returned to stable conditions.
This is the best-case type of project. Early discovery often keeps the work focused and short.
A moderate basement issue after a leak
A basement leak may affect wallboard, stored contents, and the edge of finished flooring. On the surface, it can look manageable. Basements often hold moisture in ways that are less obvious, so the timeline usually reflects both remediation and careful drying.
The work may unfold over several days:
Early phase
Assessment traces where the leak traveled, not just where the staining is visible. That matters because water can move behind baseboards, into insulation, and along floor edges.Middle phase
Containment is set up, damaged porous materials are removed, and salvageable structural surfaces are cleaned. The goal is to separate what can be saved from what is likely to keep supporting growth.Later phase
Drying equipment runs until moisture readings are acceptable, followed by cleanup and planning for repairs. This part often takes longer than owners expect because concrete, framing, and lower-level spaces can release moisture slowly.
A basement project often feels slow for one reason. Drying does not follow the clock. It follows the materials.
A larger home with multiple affected rooms
In a larger residence, a roof leak or plumbing failure may affect several rooms or even more than one floor. At that point, the schedule is shaped by coordination as much as by cleaning.
One room may be ready for removal work while another still needs investigation behind finishes. Contents may need to be protected or moved before access opens up. Crews also have to keep clean living areas separated from active work zones, much like closing doors between rooms while painting, except the situation carries more gravity because the concern is contamination control, not paint splatter.
When mold appears in multiple rooms, the project becomes a sequence problem. The team has to decide what gets opened first, what can dry in place, and what must stay isolated until surrounding areas are addressed.
A warehouse, clinic, or other commercial facility
Commercial projects usually take longer than small residential jobs because the remediation plan has to fit the building's operations. A crew may be working around inventory, patient care, staff schedules, restricted access areas, or shared ventilation systems. That creates a phased schedule instead of a simple day-by-day sequence.
A warehouse might be divided into zones so one section can stay offline while another remains in use. A clinic may require after-hours work, tighter isolation, and extra coordination before any area is cleared for normal activity. In both cases, the added time serves a clear purpose. It protects people, limits disruption, and reduces the chance that contamination spreads beyond the original problem area.
Property managers often benefit from planning tools built for these larger projects, such as this guide to mold remediation planning for commercial buildings.
Commercial timelines often look less like "Day 1, Day 2, Day 3" and more like staged work zones, controlled access periods, drying intervals, and verification before the next area reopens.
Key Factors That Can Shorten or Extend Your Timeline
Two properties can start with what looks like the same mold problem and end up on very different schedules.
The reason is simple. Remediation time is shaped less by the stain you can see and more by the conditions hiding around it, behind it, and feeding it. A spot on drywall might stay a small, contained project. That same spot can also be the visible edge of a larger moisture path running through insulation, framing, or adjacent rooms.

A good way to understand the timeline is to separate surface appearance from project reality. Mold remediation works a lot like tracing a roof leak. The drip you notice in one place is not always where the problem begins, and fixing only the visible symptom usually leads to repeat work.
The variables that matter most
Several factors tend to shape the schedule more than anything else:
Extent of growth
A contained area is faster to isolate, clean, and verify than growth that has spread behind finishes or into multiple rooms. More spread means more containment, more material evaluation, and more cleaning time.Type of material affected
Different materials hold moisture and contamination in different ways. Non-porous and semi-porous surfaces may be cleaned if they are structurally sound. Drywall, insulation, ceiling tile, and other porous materials often require removal once mold growth is established. That changes labor, drying, debris handling, and rebuild timing.Moisture source complexity
A straightforward plumbing leak can often be identified and corrected quickly. A roof leak, building envelope problem, drainage issue, or condensation pattern may take longer because the crew has to confirm where the water is coming from before the area can be closed back up.HVAC involvement
If return air pathways, ductwork, or shared air movement are involved, the job usually becomes more controlled and more time-sensitive. The added steps are there for a reason. Air systems can carry particles beyond the original area, so the team may need broader isolation, cleaning, or inspection before reopening spaces.
Why testing and access can change the schedule
Owners are often surprised that some of the timeline is spent on decisions, not demolition.
That is usually a good sign, not a delay caused by inaction. Testing, moisture mapping, and targeted opening of materials help the crew avoid guessing. If a team rushes past that part, they risk removing too little, removing too much, or missing the condition that caused the growth in the first place.
Testing does not happen on every job, and it is not a substitute for visible inspection. But when it is used, it can add time for sampling, lab processing, interpretation, and scope adjustments. The same applies when the project involves an unusual material, a sensitive environment, or a question about whether an area is ready for clearance.
Access matters just as much. An open storage room is one kind of project. A mold issue behind custom cabinetry, above a finished ceiling, or inside an occupied office suite is another. Tight access slows removal, careful staging protects unaffected areas, and occupied spaces often require work windows that fit around people, patients, tenants, or operations.
For a visual explanation of how real-world conditions affect project pacing, this short video is useful:
Moisture history also matters. A newer leak may allow a narrower scope if materials are still intact and the source is corrected quickly. Long-term dampness often leads to broader affected areas and more reconstruction. Property owners who want to reduce the chance of repeat remediation should also understand the basics of mold prevention and moisture risk reduction in homes.
A quick decision table
| Factor | Usually speeds things up | Usually slows things down |
|---|---|---|
| Scope | Localized area with clear boundaries | Hidden or widespread growth |
| Materials | Surfaces that can be accessed and evaluated easily | Porous materials or mixed assemblies needing different methods |
| Moisture source | Obvious source corrected early | Intermittent or hard-to-trace moisture problem |
| Access | Open, unoccupied area | Tight, occupied, or sensitive spaces |
| Testing | Scope is already clear | Sampling, lab review, or clearance coordination needed |
The first schedule is usually a planning range. As hidden conditions become clearer, the timeline becomes more accurate too.
How Property Owners Can Help Expedite the Process
Owners can't remove the technical steps from mold remediation, and they shouldn't try to. What they can do is reduce avoidable delays and make the site easier to assess, isolate, and restore.
That starts with responding quickly. Mold problems tend to become more complicated when moisture remains unresolved or when people keep using the space as if nothing is wrong.
What helps before the crew arrives

A few practical steps can make the project smoother:
Address the water issue if it's safe to do so
If a leak source is obvious and can be safely shut off, doing that early limits additional moisture exposure.Document what you saw
Photos of the first signs, the leak source, or changing conditions can help with insurance communication and project clarity.Clear access to the affected area
Crews work faster when they can reach walls, corners, utility spaces, and flooring edges without moving large amounts of stored property first.Avoid disturbing the mold
Scrubbing, sanding, or tearing into materials can spread spores and complicate containment.
The most important decision
The biggest time-saver is choosing a qualified professional early instead of trying multiple surface-level fixes first. DIY efforts often delay the proper work because they mask the symptoms without addressing the wet material, hidden spread, or containment needs.
For owners focused on prevention after the project, this guide on reducing mold risks in healthier homes is helpful once the immediate issue is under control.
Good communication speeds everything up
Property owners and managers who stay organized usually help the process move with fewer interruptions. That doesn't mean managing the crew. It means making decisions promptly and sharing the right information.
A simple checklist helps:
Confirm who approves work decisions
In commercial settings, delays often happen when no one is clearly authorized to approve access, demolition, or restoration steps.Notify affected occupants early
If a room, suite, or wing will be restricted, clear communication prevents confusion and repeat interruptions.Start insurance communication right away
Claims often move more smoothly when documentation begins early rather than after cleanup has already advanced.Ask what “done” means for your project
Some owners expect paint-ready restoration, while others only need safe remediation and drying. Aligning expectations prevents schedule surprises.
Owners who act quickly, preserve access, and avoid disturbing the area usually give the remediation team the best chance to finish efficiently.
Why a Professional and Methodical Approach Is Critical
Mold remediation isn't just a race to remove visible staining. It's a controlled risk-management process. The team has to protect occupants, prevent cross-contamination, remove unsalvageable materials correctly, dry the structure, and support a safe return to normal use.
That is why a methodical approach matters more than a fast-looking one. A crew can make a room look cleaner in a short time. That doesn't mean the moisture problem is solved or the hidden contamination is gone. For owners who want a plain-language outside resource on that distinction, Can Do Duct Cleaning's mold guide offers a helpful overview of what proper removal should account for.
For more detail on why trained remediation matters for safety, insurance, and cleanup standards, this article on mold remediation by biohazard cleaning companies is worth reading.
The central point is simple. A realistic timeline is a sign that the work is being taken seriously. Careful containment, documented drying, and proper verification protect both the property and the people who use it.
Common Questions About the Mold Remediation Process
Can people stay in the property during remediation
Sometimes yes, sometimes no. It depends on where the mold is, how large the affected area is, and whether containment can fully separate the work zone from occupied spaces.
In a small, isolated area, partial occupancy may be possible. In larger jobs, or in properties with sensitive occupants, temporary relocation from the affected area may be the safer choice. Commercial and healthcare environments often require even more caution because operational continuity has to be balanced with exposure control.
Will the property smell after remediation
Some odor may linger briefly during cleaning, demolition, or drying, especially if wet materials have been in place for a while. What matters is whether the underlying moisture and contaminated material have been addressed.
If the smell persists after the project is supposedly complete, that's worth asking about. Odor alone isn't a complete diagnostic tool, but it can signal that moisture or affected materials still need attention.
Is post-remediation testing really necessary
It depends on the property, the scope, and the stakeholder requirements. In many situations, final verification is an important quality-control step because it helps confirm that the area is dry, clean, and ready for re-occupancy or repair.
This is especially valuable in commercial spaces, multi-unit properties, and projects involving liability concerns or occupant sensitivity. Even when formal testing isn't required, a documented final inspection helps everyone understand what was done and what condition the area is in now.
If you're dealing with mold and need a clear, professional assessment, 360 Hazardous Cleanup can help you understand the scope, the safety considerations, and the realistic timeline for your property. Their team approaches high-stress situations with discretion, regulatory awareness, and the kind of direct communication that helps owners and managers move forward with confidence.