A chemical spill usually starts the same way. Someone smells something sharp, sees liquid moving across a floor, notices a tipped container, and suddenly the whole building feels less stable. In that moment, facility managers aren't just thinking about the puddle. They're thinking about employees, patients, tenants, production downtime, reporting obligations, and whether the next decision will make the situation safer or worse.
That pressure is real. The best response is still a disciplined one.
Good chemical spill cleanup procedures aren't about rushing toward the mess. They're about controlling risk in the right order, using the right people, equipment, and waste handling process. When a spill stays within a trained team's capabilities, a calm internal response can prevent a small event from becoming a major one. When it exceeds those limits, bringing in qualified hazmat support protects people, property, and your compliance posture.
The Critical First Moments of a Chemical Spill
The first mistake people make is treating every spill as a housekeeping problem. It isn't. A chemical spill is a hazard-control event. Even a small release can create inhalation risk, slip risk, reactivity concerns, drain contamination, or secondary spread from shoes, wheels, and cleanup tools.
In practice, the first minutes should feel controlled, not heroic. People nearby need clear direction. Access needs to be limited. Someone needs to start identifying the material, not improvising with paper towels and a mop.
What matters most right away
A useful mental sequence is simple:
- Protect people first: Move uninvolved personnel away from the area and keep them out.
- Stabilize the scene: Stop movement through the spill path, especially near doorways, drains, and shared work zones.
- Identify before touching: Check the label, container, or Safety Data Sheet before choosing PPE or absorbents.
- Match the response to your training: If your team can't identify the substance or control it safely, escalate immediately.
Practical rule: The first job is to prevent a second victim.
That's where planning pays off. The American Chemical Society notes that spill planning needs to happen before a spill occurs, not after, because the response sequence only works when people already know their roles and where supplies are stored, as outlined in the American Chemical Society spill-response guide.
Facilities that do this well don't rely on memory during a stressful event. They use checklists, designated spill coordinators, and documented decision paths. Digital tools can help translate policy into action. For teams building response playbooks across shifts or locations, Resgrid workflows are one example of a structured way to map who does what when an incident starts.
Improper cleanup usually causes more damage than the original release. That's especially true in low-visibility areas like utility rooms, garages, and basement storage spaces, where spread into porous surfaces and drains is easy to miss. This is exactly why improper cleanup is risky in garages and basements.
Initial Assessment and Emergency Actions
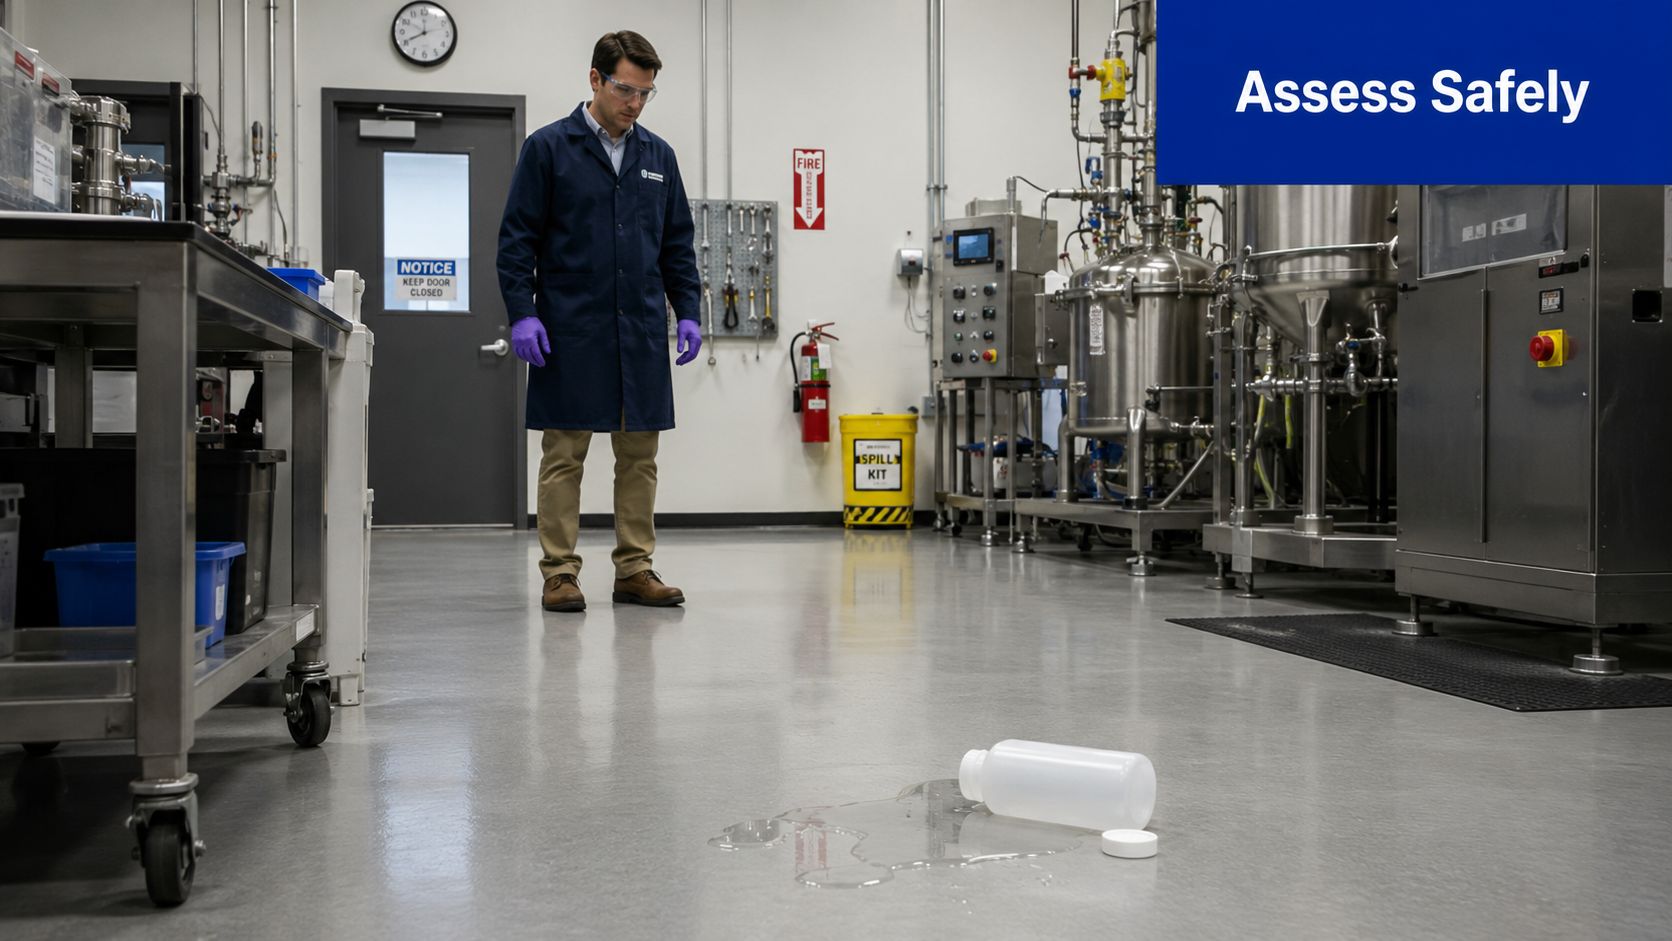
The first assessment should happen from a safe distance. Don't kneel near the spill. Don't lean over it. Don't assume the odor tells you what it is. Start by reading the scene. Is there vapor? Is the liquid moving toward a drain? Is there broken glass, active leaking, heat, smoke, or a damaged process line still feeding the release?
Those observations drive the next decision. Modern spill response is not based on instinct alone. It's based on thresholds.
When to evacuate and call for emergency response
Austin Community College's hazardous-spill guidance uses measurable triggers for escalation. Spills larger than 1 liter, chemicals with a hazard rating of 2 or above, or any spill involving an unknown chemical require evacuation and a 911 response, according to Austin Community College's hazardous spill procedures.
That kind of threshold-based response matters because it removes guesswork. A supervisor under pressure doesn't need to debate whether a spill “looks manageable.” They need criteria.
Use this decision frame:
- Can you identify the material confidently?
- Is the release already stopped, or is it still active?
- Does your team have the exact PPE and absorbent needed?
- Can trained staff contain it without exposure or spread?
If the answer to any of those questions is no, the scene needs a higher level of response.
Unknown chemical equals unknown risk. Unknown risk is not a cleanup assignment for unprotected staff.
Immediate actions that reduce harm
Once you've determined the area needs immediate control, focus on short, clear actions:
- Warn nearby occupants: Use plain language. Tell people where not to walk and where to move.
- Restrict entry: Close doors if appropriate, post someone at the perimeter, or use barriers.
- Shut down ignition sources if relevant: This matters for flammable or vapor-producing materials, but only if it can be done safely.
- Locate the SDS and container information: The label and SDS often answer the most important early question, which is what the product does to eyes, skin, lungs, and surrounding materials.
A facility also needs a written escalation path before an event happens. If yours is still informal, reviewing a strong action plan for facilities can help you tighten notifications, responsibilities, and documentation flow.
In-house teams should also be honest about the limits of awareness-level training. Chemical spill response quickly moves into regulated territory when the material is hazardous, the volume is significant, or waste handling becomes complex. That's why certifications and standards matter, as explained in this overview of OSHA HAZWOPER, EPA, and IICRC expectations.
Selecting the Right Personal Protective Equipment
PPE selection is where many well-meaning responses fail. People hear “wear protection” and think any glove, any mask, and any eye covering is enough. It isn't. The chemical decides the PPE, not the other way around.
Start with the SDS, not the supply cabinet
A proper PPE decision starts with the Safety Data Sheet and product label. You're looking for practical questions:
- Is the main danger splash contact, vapor inhalation, or both?
- Does the chemical damage skin, eyes, or respiratory tissue first?
- Will common glove materials resist it, or will they degrade quickly?
- Does the task involve a brief transfer, or prolonged contact during cleanup?
A disposable dust mask is not a substitute for a respirator. Safety glasses are not the same as chemical splash goggles. Thin nitrile gloves may be suitable for some products and completely wrong for others. The risk isn't just under-protection. The wrong PPE can give workers false confidence, which often leads to longer exposure.
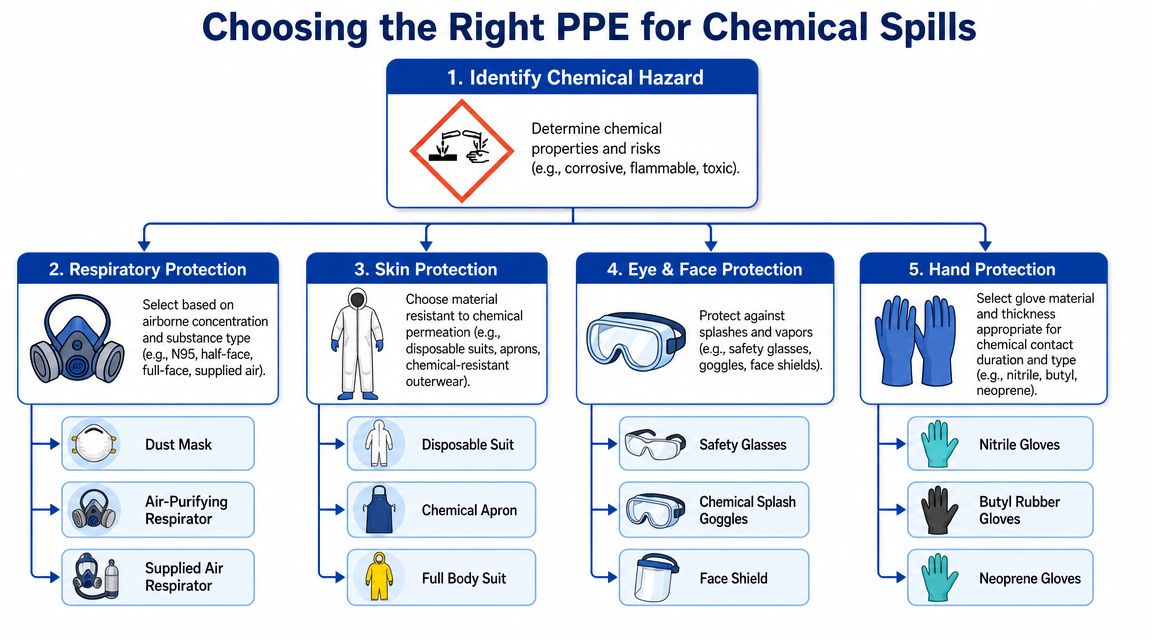
Four PPE categories that must match the hazard
Here's the practical breakdown facility managers should keep in mind:
- Respiratory protection: Use this only when the hazard and equipment match. Air-purifying respirators and supplied-air systems serve different situations. A filtering facepiece doesn't solve a vapor hazard.
- Hand protection: Glove material matters. Nitrile, butyl, and neoprene don't perform the same way against every chemical.
- Eye and face protection: Splash goggles protect differently than open-sided glasses. A face shield may be needed, but usually as added protection rather than the only barrier.
- Body protection: Aprons, disposable suits, or fully chemical-resistant outerwear depend on the splash potential and the material involved.
PPE has to protect against the substance you have, not the one you hoped it was.
Fit, inspection, and condition matter just as much as selection. A damaged glove cuff, expired cartridge, fogged eyewear, or poorly sealed respirator turns “protected” into exposed very quickly.
This is one reason professional responders maintain multiple PPE options and select them based on the specific hazard, not convenience. The same principle applies in biohazard and chemical work alike, which is why the importance of PPE in hazardous cleanup goes far beyond wearing more gear.
Spill Containment and Stabilization Techniques
Containment is the point where a spill stops being a moving problem. Until the liquid is controlled, cleanup is premature.
The core hierarchy is well established. The American Chemical Society's official guidance directs responders to stop the source, contain the spill by diking, add absorbents from the outer edge inward, and then collect the waste for proper disposal. That outside-in method is a foundational best practice.
Stop the source if it can be done safely
Containment begins at the release point, not the middle of the puddle. If a valve can be closed safely, close it. If an upright container can be stabilized without contact risk, do that. If the source is damaged piping, a pressurized system, a reactive container, or anything generating vapor, backing out is the safer choice.
Then build boundaries. Absorbent socks, booms, drain covers, and diking material all serve the same purpose. They stop migration.
Key priorities during stabilization include:
- Protect floor drains and thresholds: A spill that reaches plumbing or stormwater systems becomes a much larger incident.
- Work downhill and outward: Watch the direction of travel before placing absorbents.
- Keep traffic out: Shoe prints and cart wheels can track contamination well beyond the original footprint.
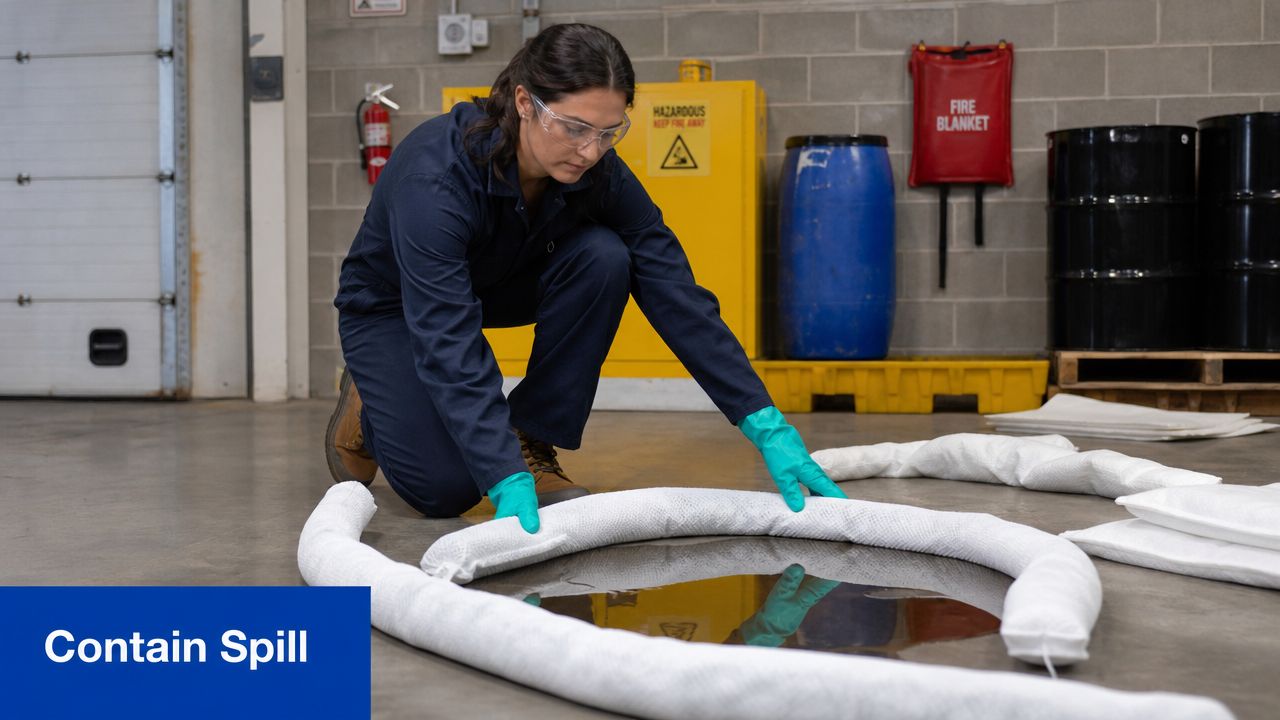
How to apply absorbents correctly
The most common error is dropping absorbent directly into the deepest part of the spill and splashing the material outward. That spreads contamination and can increase exposure.
The safer method is deliberate:
- Place diking material around the spill perimeter.
- Start adding loose absorbent at the outer edge.
- Move gradually toward the center until the liquid is covered.
- Let the absorbent do its work before pushing or sweeping.
Cornell's environmental health guidance uses the same operational logic for incidental spills. Notify others, protect drains, apply absorbent until the spill is covered, then sweep from the outside toward the middle and place the waste in a leak-proof container.
A short visual refresher can help teams understand the pacing and hand movements involved during this stage:
Stabilization buys you control. Control buys you safer cleanup.
Specialized tools often make the difference between a contained event and a spreading one. Drain seals, chemical-resistant overpacks, compatible absorbents, and dedicated collection tools need to be ready before an emergency. For a practical look at that equipment side, specialized hazardous cleanup tools and gear show why standard janitorial supplies aren't enough.
Cleanup and Neutralization Methods by Chemical Class
Containment gives you time. Chemical class tells you what you can safely do with that time.
This is the point where facilities either regain control or make the spill more dangerous. OSHA and EPA rules set the boundaries, but the hard decision under pressure is practical. Do we neutralize, absorb, overpack, or stop and call a qualified hazmat team? The answer depends on the product's class, the SDS, the amount released, the surface involved, and whether your staff can manage the reaction safely.
The working rule is straightforward. Match the cleanup method to the chemical class. If the material is unknown, treat that as an escalation, not a puzzle for staff to solve on the floor.
Chemical spill cleanup cheat sheet
| Chemical Class | Cleanup Method & Absorbent | Critical Warning |
|---|---|---|
| Acids | Use a compatible neutralizing agent identified for acid spills, then absorb the resulting material with spill-control media suited to the product. Collect residues into a leak-proof hazardous waste container. | Don't apply a neutralizer unless you know it is compatible with the specific acid and your staff are trained to manage heat, splatter, or gas release during neutralization. |
| Bases | Use a base-compatible neutralizing approach and absorbent media recommended by the SDS or spill kit manufacturer. Package all contaminated material for hazardous waste disposal. | Don't assume a mild acid is safe to use. The wrong pairing can create a violent reaction or aerosol. |
| Flammable solvents | Eliminate ignition sources if it is safe to do so. Use non-sparking tools and absorbents intended for solvent spills. Containerize waste in compatible, closed containers with proper headspace. | Don't use tools or materials that may create sparks. Don't treat vapor-producing solvent spills like ordinary liquid cleanup. |
| Oxidizers | Use inert, compatible absorbent material and collect carefully into appropriate hazardous waste containers. Keep contaminated waste separate from incompatible debris. | Don't use organic absorbents or general debris that could react. Materials that seem harmless in other spills may increase fire risk with oxidizers. |
| Unknown chemical | Isolate the area and escalate to qualified responders. Maintain containment only if it can be done safely from the perimeter. | Don't try to neutralize or absorb an unknown product based on color, smell, or location. |
What changes by chemical class
Acids and bases can both burn skin, damage concrete, and ruin equipment, but the cleanup risk is not identical. Neutralization can generate heat, spatter, and fumes. On paper, “neutralize and absorb” looks simple. In a facility aisle with anxious staff nearby, that reaction has to stay controlled, measured, and within the team's training.
Flammable solvents change the whole job. Cleanup is no longer just about the liquid on the floor. Vapor control, ignition source isolation, bonding or grounding practices where required, and non-sparking tools become part of the response. If staff cannot control those conditions, cleanup should stop at isolation and scene protection.
Oxidizers demand discipline in material choice. A general absorbent that works for oil or solvent spills may create a fire problem here. Convenience is a poor standard during a hazardous release.
Unknowns are where experienced responders slow down. If no one can identify the product from the container, label, process line, or SDS, the safest decision is usually to hold the perimeter, keep people out, and bring in personnel with the equipment and authority to characterize the hazard.
Neutralization is a tool, not a default
Neutralization helps when four conditions are met. The spilled chemical is positively identified, the neutralizer is known to be compatible, the team expects the reaction behavior, and the waste stream can still be packaged and disposed of correctly afterward.
If any one of those conditions is missing, absorb and containerize may be the safer path, or the right call may be to hand the event over to a hazmat contractor. Facility managers often feel pressure to “finish the cleanup” quickly so operations can resume. That pressure is understandable. It also causes secondary incidents when staff use the wrong powder, overapply neutralizer, or kneel too close to a reacting pool.
Calm, controlled work protects people better than fast work.
Waste collection is part of the response
Cleanup is not complete when the floor is dry. The absorbent, residue, disposable PPE, and rinse water can all become regulated waste, and poor packaging can turn a controlled spill into a disposal violation or a second release in storage.
American Chemical Society guidance advises placing residues in a container and double-bagging dry residues, while keeping cleanup materials out of normal trash for hazardous waste disposal. Cornell's procedure also calls for collected waste to go into a leak-proof container, with wash water collected when toxicity makes ordinary rinsing unsafe. CCOHS guidance summarized in the verified material adds a practical handling point. Leave headspace in liquid waste containers so they do not overflow during movement or temperature change.
For facility teams, that means:
- Use compatible containers: Package corrosives, solvents, and reactive debris in containers suited to the material.
- Keep hazardous cleanup waste separate from regular trash: Once absorbent contacts a hazardous chemical, disposal rules change.
- Label the container clearly: Disposal vendors and internal EHS staff need to know what is inside.
- Plan for mixed waste issues: Neutralized residue, contaminated absorbent, and rinse water may not all go into the same container.
- Verify disposal requirements early: This short guide to what qualifies as hazardous waste and how it is disposed of safely helps explain why packaging decisions during cleanup affect everything that follows.
That last point matters more than many teams expect. A spill response is not judged only by how fast the floor is reopened. It is judged by whether people were protected, the reaction stayed controlled, and every contaminated material entered the correct waste stream without creating a new hazard.
Decontamination, Documentation, and Prevention
A floor can look clean and still be unsafe. Final decontamination is what turns a controlled incident into a closed incident.
Finish the decontamination properly
Cornell's procedure includes washing the affected surface after the absorbed material is collected, and it notes that highly toxic rinse water may need to be collected for disposal rather than sent away as ordinary wash water. That reflects a broader truth. The visible liquid is only part of the hazard. Residue on tools, PPE, flooring, shelving, and nearby surfaces can continue the exposure pathway.
Post-cleanup decontamination should include:
- Personnel decon: Remove contaminated PPE carefully to avoid skin transfer.
- Tool decon: Scoops, brooms, squeegees, and carts can spread residue to storage rooms and vehicles.
- Surface verification: Check that the area is safe for normal occupancy, not just visually dry.
A spill isn't over when the puddle is gone. It's over when the hazard is removed, the waste is secured, and the records are complete.
Documentation protects the facility after the event
The paperwork matters for the same reason the PPE and absorbents matter. It preserves control. If an employee reports symptoms later, if an insurer asks what happened, or if a regulator reviews the event, your records need to show that the response was organized and defensible.
Keep a clear incident file that includes:
- What was spilled: Product identity, source container, and known hazards.
- Where and when it happened: Exact location, discovery time, and affected areas.
- Who responded: Names, roles, and any contractor involvement.
- What actions were taken: Isolation, containment, cleanup materials used, waste packaging, and decontamination steps.
- What was generated: Contaminated PPE, absorbent, broken containers, and any collected rinse water.
Waste documentation also needs to be accurate from containerization through final disposal. If your team handles any part of that chain, they need to understand what qualifies as hazardous waste and how it must be packaged and routed. This overview of hazardous waste handling and safe disposal is a useful reference for that part of the process.
Prevention after the incident
A good after-action review asks practical questions, not blame-focused ones.
Did the spill kit have the right absorbents? Was the nearest drain protection device easy to access? Could the night shift find the SDS quickly? Did staff know when to evacuate instead of attempting cleanup?
The strongest prevention measures are usually operational:
- Place spill kits near actual hazard points, not just near exits
- Review container handling and transfer practices
- Train by scenario, not by binder alone
- Update emergency contacts and reporting roles
- Restock and inspect response supplies after every incident
A spill should leave behind a safer facility than the one that existed before it.
When a chemical spill goes beyond an incidental event, speed matters, but so does judgment. 360 Hazardous Cleanup provides hazardous material cleanup, waste handling, and remediation support for facilities that need a compliant, professional response during a stressful situation.